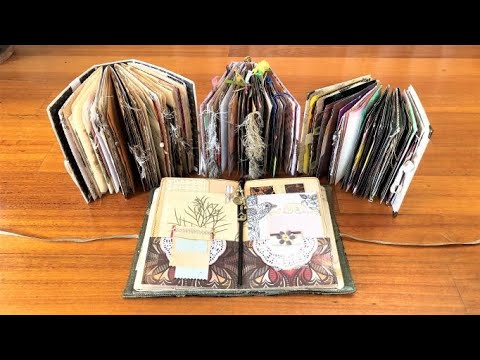
If you've been looking for a no-sew binding method that lets your books lie completely flat — and works just as well for a single greeting card as for a full journal of sewn signatures — tab binding might be exactly what you've been missing. In this tutorial I walk through the whole tab binding process using envelopes as the demo pages, and then show you a range of finished projects: a CD-case ephemera book, a greeting card booklet, a mixed-media art journal, and a full fabric-and-gold signature journal. No sewing required for the binding itself, and the results are genuinely elegant.
What we cover
The tutorial covers how tab binding works as a universal binding method — same process whether you're binding single pages, folded pages, or whole signatures — including how to prepare your tab strips, the alternating attachment sequence, how to handle thicker signatures, and what to keep in mind about adhesives. The second half is a detailed flip-through of finished projects showing the range of what's possible with this method.
What you'll learn
How tab binding works and why it always lays flat — tabs wrap around the spine edge of each page, connecting pages to one another rather than sewing them at a central spine, which is what gives every tab-bound book that completely flat opening.
How to make your own tab strips from almost anything, including:
- Washi tape (quick, decorative, but needs glue reinforcement)
- Fabric backed with double-sided tape to create a DIY cloth tape
- Scrapbook paper or cardstock
- Cut-up packaging, bags, or any flat decorative material — I used strips from a gold gift bag here and the result looks extravagant
The alternating three-two strip sequence — the core mechanic of tab binding. You place three strips on the first page, two on the next, three on the next, and so on, with each new set fitting exactly between the previous set. The last page needs no strips at all. Getting this rhythm into your hands is the main thing the tutorial is here to show.
How to handle thicker materials and signatures without binding them shut — when you're binding thin single pages you can pull the tabs snug. With signatures, you leave a small amount of slack as you wrap so the book can open freely between sections rather than pulling tight at the spine.
Why signatures need to be secured before tab binding — tabs catch the front and back page of a signature, but all the interior pages will fall out unless you've already secured them. A three-hole pamphlet stitch is what I use; a staple from a long-arm stapler works just as well. Once secured, the whole signature gets treated as a single page.
How to combine different tab materials in the same book — the fabric-and-gold journal in the video uses plain fabric tabs for structure and gold tape strips added on top purely for decoration after the binding was complete. Because I'd left a little breathing room between tabs, I could slide the gold pieces in and glue them down without rebinding anything.
How to use tab binding for greeting cards, CD cases, and envelopes, including:
- Folded greeting cards bound so each card opens naturally to show its message
- Old CD jewel cases treated as single rigid pages and filled with ephemera
- Envelopes used as pocketed pages in a small ephemera booklet
How to add decorative tabs and cover treatments after the fact — the tutorial includes a look at adding non-functional decorative tabs on top, disguising the visible tabs on the front cover, and building pockets, tags, bows, and gold corners into the cover design.
Tips & gotchas
Double-sided tape is not permanent — add glue. Washi tape has the same problem. If you bind a book using only double-sided tape or washi tape, things will start to peel, sometimes within a day or two. A small dab of glue on each edge as you go makes the bond permanent. In the video I skip this step to keep things moving, but in a real project I always add the glue.
Don't use double-sided tape on the inner face of tabs when binding signatures. With thin single pages, the pages close together so tightly that the exposed tape edge is never an issue. With signatures there's a gap between them at the spine, and that gap would be sticky — not something you want when you're flipping through a journal you're writing in. For signature binding I skip double-sided tape on the inner side entirely and use glue only.
Leave a little space when wrapping tabs around thicker signatures. The temptation is to pull tight for a tidy finish. Don't. If you bind signatures too snugly, the book will be stiff and want to gap open on the page side. A small amount of slack when you wrap means the book opens freely.
Secure your signature pages before you start tab binding. A three-hole pamphlet stitch, a staple, or even regular sewing through the fold — any of these works. Without it, your tabs will hold the first and last pages of each signature, and everything in the middle will fall loose.
If tabs come loose later, a small amount of glue fixes them permanently. The CD-case book I show in the video had tabs come undone the next day — expected, given how full those pockets were. A touch of glue and they've held ever since.
Plan ahead if you want to add decorative tabs later. The gold tape strips I added to the fabric journal were an afterthought, and they only worked because I'd left enough breathing room between the fabric tabs to slide new pieces in. If your tabs are packed too closely together, there's nowhere to add anything on top.
The gold-and-fabric journal I show at the end is probably the most ambitious version of this, but even a quick envelope booklet made in an afternoon uses the exact same sequence. Once the alternating logic clicks, you start seeing potential projects in things you'd otherwise toss — old cards, painted paper scraps, packaging you've been hoarding because it was too beautiful to throw away.