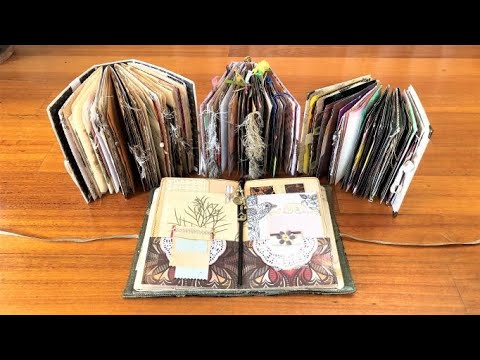
If you've been staring at a pile of beautiful papers and wondering how to actually pull them into a cohesive journal signature — what to choose, how many pages, what order — this is the video I made to answer that. I walk through my entire signature-making process from scratch: the five categories of paper I draw from, how I decide on page count, how I use a template to size everything, and how I plan pockets before any cutting happens. By the end you'll see a finished, embellished journal and understand the decisions that shaped every page in it.
What we cover
This tutorial covers the full process of assembling a junk journal signature — from choosing papers across five categories (plain, lined, book pages, specialty papers, and extras), to sizing with a template, to arranging pages inside the signature. It also includes a walkthrough of the finished, embellished journal so you can see how the page choices play out once everything is bound, inked, and filled.
What you'll learn
The five categories of paper I use in every signature, and roughly how much of each to include:
- Plain paper — white or dyed (tea, coffee, avocado, onion skin), used most
- Lined paper — dyed or undyed, including ledger pages and removed notebook sheets
- Book pages — novels, quote books, poem books, illustrated books, dictionaries; used in smaller quantities because writing space is limited
- Specialty papers — vellum, scrapbook paper, gift wrap, mulberry/handmade-look paper, coloring sheets, maps, music paper; used generously
- Extras — envelopes, paper bags, doilies, napkins; used least, mostly for functional pockets or texture
How to decide how many pages to put in a signature:
- One-signature journal: 15–20 pages
- Two-signature journal: 10–15 pages per signature
- Three or more signatures: around 10 pages per signature
How to make a sizing template and why it matters — I cut a piece of cardstock to the exact maximum height a page can be in my journal. Every paper gets checked against this before anything is trimmed. It sounds simple, but it's the thing that keeps signatures from being a mess of uneven edges.
How to plan pockets before you cut — large pages that extend past the template don't have to be trimmed off. I show three pocket approaches: pages that fold in to create a closed pocket, pages that fold open to add extra writing space, and scrapbook pages folded in half and stitched shut at the center signature. The key is deciding which pages you want to keep long before reaching for the scissors.
How to fold and size pages cleanly:
- Leave a tiny bit of extra space when folding against the template — the fold itself adds a small amount of length
- Fold pocket pages in just slightly past where you need them, to be safe
- Push all pages tight against the spine before trimming the open edge
How to arrange pages inside a signature — I go through the choices I make when I'm ordering pages: leading with a vellum page, not placing two book pages back-to-back, distributing specialty papers through the stack so there's variety throughout rather than in clusters.
Why writing space drives page selection — when I'm choosing book pages especially, I look at how much blank space is actually usable. A poem book with wide margins is worth more than a dense dictionary page. I use fewer pages that offer little room to write, and I keep specialty and decorative pages to a supporting role rather than the main event.
How to think about page count mathematically — 20 folded sheets give you 80 sides (each sheet folds in half to give four sides). Knowing this upfront helps you decide whether the journal will feel full or sparse before you've sewn a single stitch.
What a finished, embellished signature looks like — I show the completed journal after binding, inking, sewing, and filling: pockets holding envelopes and ephemera, pages that open to reveal writing space, laminated botanicals used as moveable bookmarks, security envelope inserts, tags with pocket envelopes, and paper bag pages embellished and filled. The walkthrough is a practical illustration of how the page choices made during assembly translate into the finished object.
Tips & gotchas
Make your template before you touch a single page. Cut it to the exact maximum height your journal can hold — not an approximation, the actual size. Checking every paper against this template before trimming saves you from cutting pages down and then discovering they're still too tall, or cutting them too short.
The fold adds length — account for it. When you're folding a large page down to pocket size using the template as your guide, leave a tiny bit of extra height before you crease. The fold itself eats a little space, and if you fold exactly to the template edge you'll end up slightly short. I fold just a hair past where I need to, then adjust.
Push tight against the spine before you trim the fore-edge. Once everything is assembled, all pages pressed firmly toward the spine, then trim the open edge. If anything is loose or uneven when you cut, the pages will end up different lengths.
Decide on pockets before you cut anything. If a large page could become a pocket, don't trim it to the template height — that's exactly the material you need to fold back into a pocket. Plan which pages you want to keep long, set them aside, and only cut the ones you're definitely trimming flat.
Use fewer dictionary and dense book pages. There's not much a journaler can do with a page that's solid text edge to edge — you can't write on it, and you can't really collage onto it without covering it entirely. One or two per signature is plenty. Poem books and illustrated books with margins are far more useful.
Vary the hues throughout. When I'm choosing from my plain and dyed papers, I'm specifically looking for variety — a warm avocado tone, a cooler tea-dyed sheet, a near-white page. The difference in hues is what makes the journal look rich rather than flat. Don't pull five sheets that are all the same warm beige.
For a sellable journal, keep the ephemera moveable. I clip most of the inserts in rather than gluing them down — envelopes, journaling spots, bookmarks. That way whoever buys the journal can rearrange everything, remove what they don't want, or use the pieces in their own collaging.
Each of those steps builds directly on the page choices made here, which is why I find it worth slowing down at the assembly stage rather than rushing to the needle and thread. The finished journal in this video has envelopes, laminated botanicals, book page bows, security envelope inserts, hand fan bookplates, and washi tape accents throughout — all of it resting on a foundation of 20 carefully chosen, properly sized pages.


