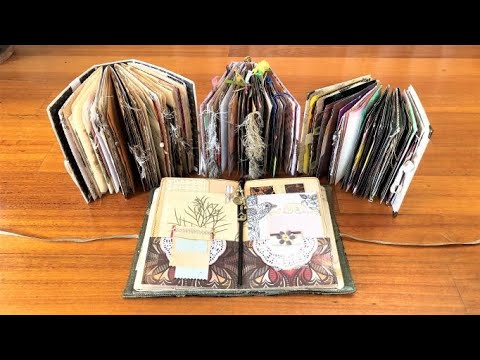
If you've been eyeing exposed spine journals and wondering how on earth those threads wrap around the spine and hold everything together — this tutorial is for you. I cover the full process of building a wraparound binding junk journal from scratch: constructing a hardcover from a cereal box, cutting and assembling signatures with slits for the binding, threading beads onto the spine, and embellishing the inside pages before everything gets locked into place. The result is a journal that looks elaborate but is built on a handful of repeatable steps.
What we cover
This tutorial walks through building a wraparound binding journal from an empty cereal box — spine construction, cover wrapping with book pages, inner lining with calico, signature-making with cut slits for the binding thread, bead threading on the spine, and a full embellishment pass before the final flip-through. I also show two alternative approaches: binding with a pamphlet stitch instead of wraparound, and using greeting cards as signature pages.
What you'll learn
How to construct a half-spine from a cereal box, including:
- Cutting the box down and marking the spine height
- Folding and trimming the flaps so they reinforce the spine without creating bulk
- Adding a second strip of cardboard inside the spine for extra rigidity
Why the spine needs to be thick and sturdy for wraparound binding — the binding thread is knotted directly to the spine rather than sewn through it, so the structure has to hold tension from multiple signatures without flexing.
How to reinforce the side panels — gluing an extra layer of cereal box cardstock to the front and back panels before covering, so the finished cover is genuinely hard rather than just stiff.
How to cover the outside of the journal with book pages, including:
- Joining two sheets of copy paper to create one large covering sheet
- Tearing and layering book pages over the surface
- Cutting into the corners and folding the edges in cleanly, using a ruler and bone folder for neat wraps
- Handling corner finishing so the edges are completely sealed
How to line the inner spine with fabric instead of paper — I use calico (muslin works too). Fabric holds up to the repeated opening and closing of the book in a way that paper eventually won't. The strip is cut to the exact spine height with extra width to bridge the fold on both sides.
How to cut slits in signature pages for wraparound binding, including:
- Using a template cut to the exact spine height so every slit is consistent
- Finding and marking the centre of each page before cutting
- Why the slits need to match the spine height precisely — too long and the string shows above or below the book; too short and the thread won't sit correctly
How to assemble signatures for this binding, including:
- Using cardstock, file folders, and scrapbook paper as signature pages
- Building a template to trim all pages to the maximum size that fits the cover
- Keeping signatures to a manageable number of pages so the book doesn't become too thick to close once it's embellished
Three different signature styles you can use with this cover:
- Wraparound binding with slitted pages (shown in full in this tutorial)
- Three- or four-hole pamphlet stitch sewn through the spine
- Greeting cards covered with scrapbook paper or paint, bound the same way
How to do the wraparound binding, including:
- Threading twine or waxed thread through the slits so it exits on both sides of each signature
- Placing the signature against the spine and wrapping the thread around
- Threading beads (rolled paper beads, gold spacer beads) onto the strings before tying the final knots
- Tying a triple knot tight enough to hold the signature with real resistance, not just a light tug
What to do with the binding thread tails on the inside, including:
- Tying them to small tags or clothing labels as floating journaling spots
- Knotting decorative elements (hearts on a string, paper bows) onto the ends
- Keeping the tails short enough that they don't get caught between signatures when the book is opened
How to embellish the pages before binding — sewing, inking, adding pockets and belly bands, and attaching ruffles all has to happen before the book goes together, because a bound journal can't go through a sewing machine.
How to decorate the front cover — layering packaging paper, music pages, lace, and a cut-out image, then stitching them together before gluing down as a single piece.
Tips & gotchas
After covering the outside of the journal and after lining the inner panels, leave everything flat under something heavy — ideally overnight. With multiple layers of paper (copy paper plus book pages can stack up to three or four layers), things will lift and warp if you move on too soon. Getting it completely flat before the next step saves a lot of frustration later.
The slits in your pages need to match the spine height exactly. Cut them even slightly long and the threads will stick out above or below the spine once the book is bound. I measure the spine height using a small piece of cardstock as a template and cut every page to that exact mark before assembling signatures.
Use fabric — calico, muslin, whatever you have — for the inner spine strip. Paper will eventually tear at the fold with regular use. The fabric doesn't have to look perfect; most of it will be hidden behind the signatures once the book is bound.
Knot as tightly as you can, and triple-knot every signature. The binding thread is the only thing holding each signature to the cover — there's no sewn connection. If a knot is loose, the signature will shift and eventually pull free.
Do all your sewing before binding. Once the signatures are wrapped and knotted onto the spine, the book can't go through a sewing machine. Any decorative stitching, pocket-making, or page attachment needs to be done while the signatures are still separate.
Add beads, buttons, or any spine decorations before you tie the final knots. You can't thread them on afterwards.
Keep the thread tails on the inside of the book short enough that they don't get caught between signatures when the book flexes. I learned this one from the journals I made before this one — long tails sound fun until they start snagging on everything.
Three signatures is the right number for this size of journal. Four signatures sounds like more, but once you add embellishments the book fills out quickly. Leaving a little room when you bind means the journal can actually grow into itself.
Once you've made one, the variations start suggesting themselves: different bead combinations, different thread colours, greeting cards as signature pages, or a faux handmade paper cover instead of book pages. The wraparound method pairs really naturally with heavily embellished pages because the binding is forgiving — you can shift the signatures slightly even after they're knotted, so the book settles into place as you fill it. It genuinely does look like a lot more work than it is.