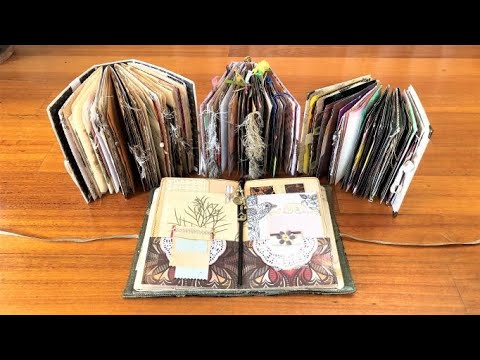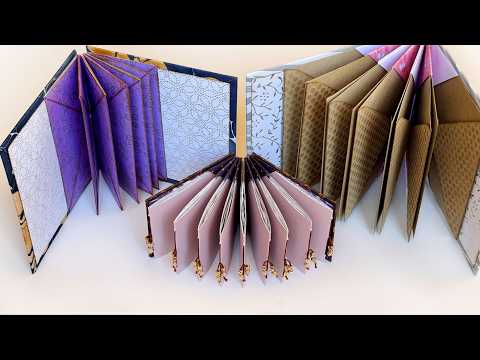
If you've been curious about the Blizzard Book — also known as Crown Binding — this tutorial walks you through the whole thing, from the first fold to finished cover. The structure is pure origami: no glue, no sewing. What holds it together is the folding itself, and what makes it so satisfying is what you can do with the result. Loose pages, removable signature booklets, envelopes full of stickers and ephemera, greeting cards kept by year — the same folded structure handles all of it.
What we cover
Starting with a 12×12 sheet of scrapbook paper, I show how to fold, score, and invert the structure that creates the characteristic slots. From there: how to join multiple sections to build a book with 12 or more slots, how to size your paper for a specific insert (like a greeting card), variations in fold increment from 1.5 inches to 3 inches, and how to make and attach a covered chipboard cover. I also show the envelope blizzard book fully loaded, and a smaller popup-scale version made from a half-sheet — plus a quick demo with A4 paper for anyone who'd rather skip the measurements.
What you'll learn
How to master the core Blizzard Book fold, including:
- Folding and burnishing a sheet into even accordion increments (by ruler/scoring board or by halving repeatedly without measuring)
- Folding the corner flaps inward, leaving a deliberate small gap from the spine
- Opening and inverting the triangles — the step that turns a flat accordion into the slotted structure
- Completing the concertina-style fold sequence to lock everything into place
How fold increment determines slot depth and page count — scoring at 3-inch increments gives four deep slots per section; 1.5-inch increments give eight smaller slots per section. The same sheet of paper, folded differently, produces a completely different book.
How to calculate paper size for a specific insert — the total height of your paper needs to be at least one full increment taller than whatever you want to slot in, on each side. So if you're folding at 1.5-inch increments, you need 1.5 inches of clearance above and below your insert, plus a little extra for easy sliding. I demonstrate this with a greeting card so you can see exactly how the math plays out before you start cutting.
How to join multiple folded sections into one book — using craft glue applied carefully away from the spine, three sections combine to give you 12 slots. You can keep adding sections from there.
How to load the book in different ways, including:
- Inserting envelopes of different sizes and styles (12 fit comfortably into the full version)
- Slotting in loose or folded single pages
- Using removable signature booklets, with one side of each booklet in one slot and the other side in the next — so the booklet spans two slots rather than bulking up a single one
- Creating a small popup-style blizzard book to embed inside a larger journal as an interactive element
How to make and attach a covered chipboard cover, including:
- Cutting two panels to size (slightly taller than the folded structure) using the first panel as a template for the second
- Applying scrapbook paper with a glue stick followed by craft glue, for a secure bond
- Cutting corners with a small gap before folding, then mitering them cleanly
- Using double-sided tape to grab and position, then gluing over for permanence
- Gluing the cover panels to the book structure, aligning front and back so the cover peeks out evenly on all sides
Why the flap direction is a design choice, not just a byproduct — the folded flaps can face outward (visible, decorative) or be glued down flat to the inside. Both work; it depends on the look you're going for. I show both options and leave the decision to you.
Tips & gotchas
When you fold the corner flaps toward the spine, leave a small gap — don't fold all the way to the spine edge. If the flap sits too close, it physically blocks the book from closing cleanly. A little white showing at the gap is far less annoying than a book that won't lie flat.
Crisp creases make everything easier. The triangle inversion step — where you push the little triangles back through to the other side — relies entirely on having a clean, defined fold to follow. If the crease is soft or uncertain, you'll be fighting the paper. Burnish every fold before moving on.
Paper weight matters more here than in most bookbinding projects. This is essentially origami, and thick cardstock will make the later folds genuinely difficult. Standard scrapbook paper (not cardstock weight) is about right. If you're just learning the structure, practice first on a magazine page or a book page — something you don't mind ruining — before working with your good paper.
When gluing sections together, stop short of the spine. Glue right to the spine edge and the fold will stiffen and fight you. Leave that little gap of unglued paper at the fold and the structure moves the way it should.
When covering your chipboard panels, cut the paper corners off at a slight angle but leave a small amount of paper before the actual corner of the board. Fold too tight to the corner and you get a thin, torn-looking edge; leave just a hair of extra paper and the corner wraps cleanly.
Finally — and I want to be honest about this — the Blizzard Book is one of those projects you cannot absorb just by watching. The folding makes complete sense once your hands are doing it, but watching without folding along tends to leave gaps. Have a throwaway piece of paper in hand from the start. Pause, fold, play, fold. That rhythm is how this one clicks.
A small version tucked into a junk journal page as a popup element. A full-sized book loaded with birthday cards going back years. An envelope book for storing stickers and ephemera with a pocket for every category. The Crown Binding has been around for a long time — Hedi Kyle is widely credited with the name Blizzard Book and with bringing the structure into the artist's book world — and it's lasted because it's genuinely that flexible. Getting comfortable with one fold size opens the door to experimenting with others, and from there the variations are really only limited by the paper you have on hand.