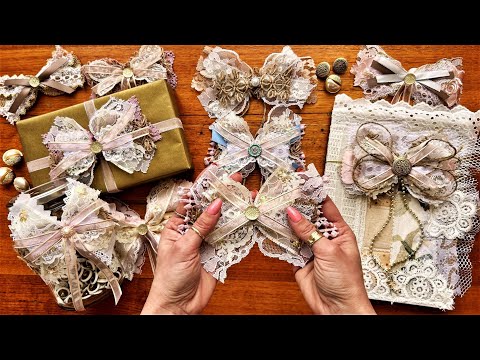
If you've got a pile of fabric scraps, odds and ends of lace, a few ribbons, maybe some yarn or twine you haven't known what to do with — this tutorial is for you. I show you how to make shabby chic fabric bows from whatever you have on hand, layer them up into something genuinely beautiful, and then put them to use: on journals, gifts, jars, packaged for a craft market stall, or as a removable closure on a junk journal cover.
What we cover
We go from raw scraps to finished bows — including the layering method, how to tie them without making a mess of the middle, and what to do with them once they're done. I also show a rustic version made from burlap, yarn, and fabric offcuts to prove you don't need a gorgeous stash to get a gorgeous result. The second half covers bow applications and how to package bows on display cards if you want to sell them.
What you'll learn
How to build a layered shabby chic bow from fabric scraps and lace, starting with the widest piece as your base and working up through progressively shorter layers — including:
- Laying pieces in a crisscross pattern for volume and texture
- Mixing lace, ribbon, fabric offcuts, yarn, and trim in the same bow
- When to break the "each layer shorter than the last" rule (to keep a motif intact, for example)
- Knowing when to stop — a three-layer bow can be just as beautiful as a seven-layer one
The square-knot tying method that keeps layers from bunching — tying loosely first, then holding the center firmly with your fingers while pulling the string tight with your thumbs. This is the step most people get wrong the first time.
How to add ribbon tails separately using hot glue rather than tying them through, so you can arrange them exactly where you want them before committing.
Three ways to finish the bow center, including:
- Repurposed earrings — remove the metal finding with pliers and hot glue the piece flat, or push the post straight through the bow layers and bend it down at the back
- Buttons — snip off the shank if it's plastic, then glue flat
- Decorative ornaments or charms, twisted closed and set on top
A rustic bow using burlap, yarn, and fabric offcuts — a deliberate exercise in making something beautiful from materials that aren't precious. One dainty or special piece on top does the work of elevating everything underneath.
How to use bows as a removable journal closure — threading an elastic band or elastic cord through the center of the bow, wrapping it around the journal, and tying it off with a square knot so it comes on and off cleanly without being glued down.
Ways to apply finished bows to gifts and everyday objects, including:
- Tied onto a small gift bag or cellophane-wrapped bundle using the bow's string tails
- Secured over a paper doily on a jar lid (jam, buttons, anything) with an elastic band
- Tied around a wrapped gift in place of a ribbon
- Tucked into or onto a pocket card or wedding invitation
How to make a simple bow display card for selling at craft markets, including:
- Choosing a plain or low-busy scrapbook paper background so the bow reads clearly
- Backing with cardstock, adhering with double-sided tape and glue for clean flat coverage
- Making DIY photo corners from gold foil cardstock when you don't have a die cut machine — cut four matching triangles, ink the edges in black, and glue in place
- Attaching the bow with sticky dots or foam tape so the buyer can remove and use it
- Sealing the finished card inside a plastic bag or cellophane for a polished, market-ready presentation
Tips & gotchas
Cut your tying string longer than you think you need at the start. If you want to use the bow's tails to tie it onto a gift or project, you need that length already in — it's awkward to add string later once the layers are in place.
The knot is where most first bows go wrong. If you just pull it tight straight away, you end up with a bunched-up middle — what I call a burrito. The fix: form your knot loosely first, position it in the center of the layered X, then hold the bow layers firm with your fingers while pulling the string taut with your thumbs. Slow down for this one step and the rest is easy.
Each layer generally wants to be a little shorter than the one below it, but there are no strict rules here. If a piece has a motif — flowers, an embroidered edge, anything you want to show — keep it the length it needs to be. The crisscross pattern gives you plenty of ways to adjust.
Put your best, most delicate piece on top. Burying a dainty bit of lace or a lovely trim under three other layers wastes it. Everything underneath is filler; the top layer is what people see first.
If you're making a bow for a journal cover and it's on the chunky side, don't glue it down permanently — it'll catch on everything while you're working in the journal. An elastic band or elastic cord threaded through the center and tied in a square knot at the back turns it into a removable closure that looks just as good and stays out of the way.
For display cards, the busier your background paper, the more the bow disappears into it. A plain or very low-pattern background lets the bow be the thing people are looking at. When you do use photo corners, ink the cut edges in black before gluing — it sharpens them up considerably and makes handmade corners read as intentional rather than unfinished.
Use sticky dots or foam tape rather than permanent glue to attach bows to display cards. The whole point of packaging them this way is that someone can take the bow off and use it — make that easy for them.
The same basic method scales in every direction. And if you've been building a scrap pile — the lace trimmings, the ribbons too short for anything else, the fabric from an old top you couldn't donate — this is a genuinely satisfying way to use it all up and end up with something you actually want to keep.