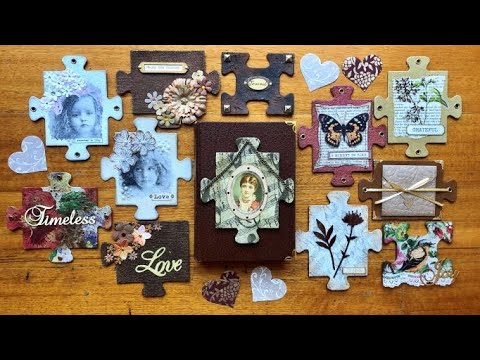
If you've got a box of old puzzle pieces sitting in a cupboard — maybe missing a piece or two, maybe with a few suspiciously tooth-marked edges — this tutorial is exactly where those pieces belong. I show how to turn large jigsaw puzzle pieces into finished embellishments ready to go straight onto a junk journal cover, using techniques like cheesecloth wrapping, faux leather tissue paper, and napkin decoupage. Each one becomes its own little piece of art before you've even opened the journal.
What we cover
Four main techniques for altering puzzle pieces into decorative cover embellishments: wrapping with cheesecloth and dry-brushing gold accents, the scrunched tissue paper faux leather look, napkin decoupage with a crisp image finish, and a painted and distressed base. The video also covers how to prep the puzzle pieces, how to embellish the finished bases with flowers, eyelets, book pages, lace, and chipboard, and — importantly — how to do all of this without a puzzle if you don't have one.
What you'll learn
How to remove the shiny top layer from puzzle pieces — instead of sanding or gessoing, you simply peel. The pieces are thick enough that you can pull away not just the gloss surface but a few layers at once, leaving a raw, absorbent base that takes glue and paint beautifully. Those irregular peeled layers also add natural texture.
How to wrap a puzzle piece in cheesecloth for a woven, aged look, including:
- Covering the front with PVA glue and pressing the cheesecloth down while wet
- Trimming the excess close to the edges
- Cutting into the cheesecloth at curves before folding it around — this is the move that keeps everything clean with no bunching
How to build a faux leather surface using scrunched tissue paper, including:
- Using a single ply of tissue paper or one ply from a napkin — anything thin enough to crease up well
- Pushing deliberate creases in while the glue is wet, then soaking everything through with more PVA
- Wrapping the edges underneath while still pliable
Why the PVA glue ratio matters — two parts glue to one part water, mixed until it's genuinely runny. This isn't exact, just loose enough to spread easily and soak through fabric and paper without dragging.
How to apply a napkin image with minimal creasing — separating the top printed ply and working it down flat with glue. I mention in the video that going over the base with white paint first would have made the image brighter; that's worth doing if the image matters to you.
How to dry-brush gold paint over cheesecloth or tissue paper, including:
- Getting the bare minimum of paint onto the brush — most of it wiped off before you touch the surface
- Working across the whole piece lightly first so the raised texture picks up just the top layer of gold
- Pressing harder once most paint is gone, which adds depth without blotching
- Layering gold, rose gold, and other metallics to build up a richer effect
How to embellish the finished bases, with examples including:
- Sewn book page scraps with distressed edges
- Chipboard pieces painted to match
- Flower clusters (including spray-painted Hawaiian lei flowers)
- Eyelets — purely decorative, but they add a finished look
- Lace strips, bling pearls, chains, and small sentiments
How to adapt these techniques to any base material — cereal boxes, cardstock offcuts, cardboard packaging. The puzzle shape is just a starting point. Everything here works on whatever you have.
Tips & gotchas
Peel, don't prep. The shiny puzzle surface resists glue and paint, but you don't need to sand or gesso it — the layers peel apart easily, and what's left underneath is already rough and absorbent. You'll often pull away more than just the top layer, and that's fine. The texture it creates is part of the appeal.
Make your glue actually runny. PVA straight from the bottle is too thick to spread through cheesecloth or tissue paper easily. The two-to-one mix (glue to water) should flow off the brush — if it's still dragging, add a little more water. You can't really oversoak these materials; you want everything saturated.
For the gold dry-brush, the error is always too much paint, not too little. Wipe the brush until it looks like there's almost nothing left. Then wipe it again. When you start working across the cheesecloth, only the very top fibres should catch any colour. If you're seeing solid strokes or blotches, the brush is still too loaded — it's easier to build up than to take back.
Clip into the curves before folding. When you're wrapping cheesecloth around the puzzle piece edges, the interlocking bumps and curved cutouts will fight you if you try to fold around them cleanly. A few small cuts into the cheesecloth at each curve lets the fabric lie flat without puckering. This one step makes the whole back edge look intentional rather than improvised.
Consider a white base under napkin images. I skipped this step on one of mine and the image came out duller than I wanted — the raw paper underneath absorbs some of the colour. If the image is the centrepiece of your piece, a quick coat of white paint or gesso under the napkin is worth the extra dry time.
Asymmetry almost always works better. I kept gravitating toward placing embellishments symmetrically — sentiment centred, flowers balanced — and almost every time I shifted something off to one side or let a flower cluster break the edge, it looked more interesting. It's worth testing before you glue anything down.
Once you've got a few in your collection, covering a Reader's Digest or a hardback with plain paper and pressing one of these pieces onto the front becomes a complete project in minutes. The same logic applies to any base: a painted cereal box panel, a chipboard offcut, a folded piece of cardstock. The techniques scale to whatever you have on hand, and they pair naturally with any of the other cover treatments I use — cheesecloth full covers, scrunched napkin journals, distressed gesso backgrounds. One puzzle you'd otherwise recycle can keep you supplied for a long time.



