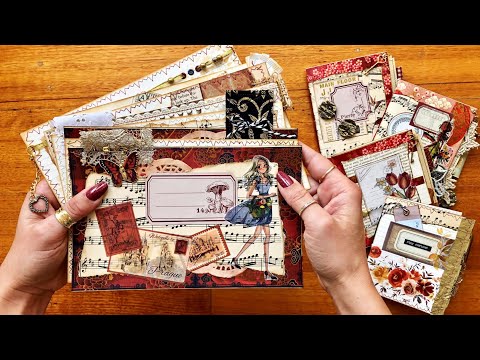
If you've been staring at a box of supplies and wondering why nothing ever quite comes together, this video might be the answer — and it's a simple one. I limit myself to five elements, pull them out, and make index card art. That's the whole idea. Five elements — a music or book page, washi tape, a sticker or label, something textural like fabric or a doily, and maybe a sewing element — and you build something from there. The constraint is the point.
What we cover
This is a project tutorial and inspiration roundup built around one central idea: limiting your supplies to spark creativity rather than kill it. I walk through making collaged index card art from scratch, show how those cards become journal covers, and then bind a complete mini journal on camera using a three-hole pamphlet stitch. Along the way I flip through a whole collection of finished pieces — singles, pockets, covers, and bound journals — so you can see how the same five-element formula plays out differently each time. There's also a washi tape haul and swatch section toward the end, showing the specific tapes, sticker sets, stamps, and ink pads I've been working with.
What you'll learn
The five-element method for index card collage — choosing a limited set of supplies before you start so you spend your energy making rather than searching. The five categories I reach for most:
- A patterned paper base (music page, book page, scrapbook paper)
- Washi tape — wide pet tape, gold-foiled tape, or a set — all counted as one element
- A sticker or label
- Something textural (fabric offcut, doily, lace, tissue paper ruffle)
- A sewing or binding element
How to build a balanced composition on an index card, including:
- Laying everything out and testing positions before committing any glue
- Using overlapping elements — sticker over a label frame, tab tucked under a washi border — to create a sense of depth
- Working the focal point on a smaller, portrait-oriented card versus a large wide one
Why I start with the patterned paper base and build up — the music page or book page anchors the whole piece and gives you something to respond to rather than a blank white card staring back at you.
How to apply sticky labels and sticker-backed washi pieces without misplacing them — peeling only a small corner of the backing first, positioning carefully, then pressing down gradually. Once a label is down it's down, so this step earns its own attention.
Creating paper ruffles from tissue paper offcuts and IKEA measuring tape — folding and gathering a strip to create texture along an edge, which adds dimension without adding another category of supply.
How to ink the edges of your index card before decorating — a small step I use on the mini journal covers that grounds the whole piece.
Turning a single decorated index card into a mini journal cover, including:
- Folding the card in half (portrait orientation) and decorating the front
- Choosing pages that stick out slightly for a rich, layered look when closed
- Binding with a three-hole pamphlet stitch: in through the middle, back out through the top hole, down through the bottom hole, back inside, tighten, knot twice, cut
Adding tabs to a bound journal — top tabs rather than side tabs when the journal is already wide, so it stays tidy without adding bulk.
Replicating a design formula with different materials — once you find a combination that works (washi tape border, book page base, label, small sticker, tab), you swap the specific tapes and stickers and land somewhere completely different while keeping the structure familiar.
Tips & gotchas
The five-element limit is real. It sounds arbitrary — and it is, I made it up — but the point is to stop the spiral of pulling out more and more bits and pieces until you're overwhelmed and paralysed. Five elements forces you to make creative decisions with what you have. Once you're in flow you can absolutely break the rule (I did, repeatedly, in this very video), but you need the boundary to get started.
Plan your composition before touching the glue. I lay everything out, shuffle pieces around, test overlaps, and then take a mental photo of where I want things. It takes maybe two minutes and it saves the frustration of peeling a label that's in the wrong place — which you can't do, because these labels aren't moving once they're down.
On that note: with sticky labels, only peel back a small corner of the backing at first. Place the corner where you want it, confirm the position, and then continue peeling and pressing gradually. Committing the whole thing at once while you're still deciding is how you end up with a slightly-off label you'll be annoyed by every time you look at the finished piece.
Overlapping elements intentionally creates depth. In one of the journal covers, I glued one edge of a label under the frame and left the other edge on top — so the label appears to break through the frame. That little spatial trick makes a flat collage feel like it has layers.
Watch your width when adding tabs. Side tabs are beautiful, but if your index card is already wide (and most are), adding tabs on both sides makes the closed journal awkward to hold. I kept all my tabs along the top edge on this set and I think it looks much neater.
When you find a formula you love — say, washi tape border, book page base, label, figural sticker, small tab — don't abandon it. Make the same thing again with different tapes and stickers. You'll be surprised how completely different it looks, and you'll build a collection much faster than if you start from scratch every time.
A handful of collaged index cards with a shared colour palette makes a beautiful little set — some as journaling spots to write on the back and tuck into pockets, one as a cover, and the rest as interior pages. The pamphlet stitch binding is quick enough that you can go from loose cards to a finished journal in an afternoon. And if you want to take the paper-texture and collage layering further, the same five-element thinking translates directly to larger journal covers, ATC cards, or even small decorated envelopes — the constraint scales with the surface.