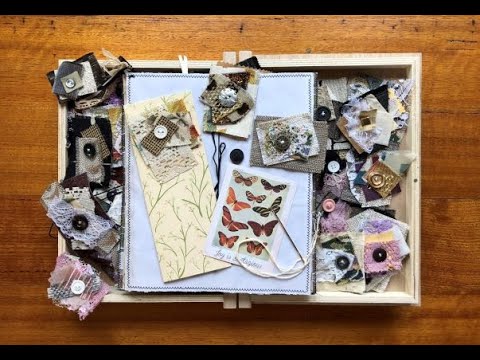
If you've got a box of fabric scraps sitting around — the kind that accumulates from every project you've ever made and never quite gets used up — this tutorial is for you. I show how to turn those offcuts into small layered fabric embellishments that work beautifully in junk journals, on tags, envelopes, bookmarks, and anywhere else you want a soft, textural focal point. The technique is simple, the results are gorgeous, and you can make a whole box of them in an evening in front of the TV.
What we cover
This is Part 6 of my Ephemera Making Series for junk journals. The focus here is one thing: fabric scrappies — small, layered clusters of fabric offcuts secured with a button or brad. I show how I layer the pieces, how to choose between a button and a brad depending on where you'll use them, and several ways to actually put them to work once you've made a pile.
What you'll learn
How to build a layered fabric cluster from scraps, including:
- Choosing a base layer and building upward with contrasting fabrics — calico, upholstery fabric, lace, blingy mesh — so each layer peeks out without being covered by the one above
- Fraying edges as you layer for a soft, organic look
- Adding a ribbon or strip of gold lace as a finishing accent before securing
How to secure your cluster with a button or a brad, including:
- Using a button as the focal point — what I think of as the thing that completes the piece
- Swapping to a brad when the cluster is thick or when you want a flatter, shinier focal point
- Poking a hole through all layers with a needle before setting the brad, so nothing shifts
Why the button-versus-brad decision matters — if you're placing a scrappy inside a journal where someone will write on the page, a thick button can create real bulk and get in the way. A brad lies much flatter. For covers and tags it matters less, but it's worth thinking through before you commit.
How to use pinking shears (zigzag scissors) to finish edges — a quick trim that adds a decorative touch and tidies any layers that feel unruly without taking away the frayed texture.
Batch-making fabric scrappies in bulk — this is genuinely a project you can run in front of the TV. I made close to a hundred and keep them in a box to pull from whenever I'm embellishing a journal or putting together an order. Having them on hand means you're never stuck staring at a plain envelope.
Where to use fabric scrappies once you've made them, including:
- Glued onto a journal page as a decorative embellishment or tab
- Attached to a paper clip to make an altered clip
- Placed inside a pocket or onto a journaling spot
- Layered onto a plain cardstock base with double-sided tape as a standalone card or gift enclosure
- Threaded onto a tag through the brad (open the brad legs, push through the tag hole, fold back) so the scrappy becomes the tag topper
- Tucked into happy mail or sent as a small gift with an order
Tips & gotchas
Button thickness matters inside a journal. If you're gluing or attaching a scrappy directly onto a journal page, check how high your button sits off the fabric stack. A big chunky button on a thick pile of fabric can create so much bulk that it's genuinely uncomfortable to write on the page. In those cases I use a brad instead — it holds everything together, still acts as a focal point, and barely adds any height.
Make sure your needle goes through every layer before you set the brad. It sounds obvious, but when you've got five or six pieces of fabric stacked up, it's easy to miss a layer. If the brad only catches some of them, the whole thing shifts and loosens over time. Take a second to check before you fold the legs.
These are a genuine scrap buster. Don't feel like you need matching fabrics or a colour scheme — the layers work because of contrast and texture, not coordination. That said, if you make journals in a particular style (vintage, shabby chic, cottagecore) it does help to pull from fabrics in that general palette so your scrappies feel at home in your projects. But mostly, just use what you have.
Make them in bulk. This is the kind of thing that's tedious if you do one at a time and completely enjoyable if you settle in and make thirty. Put something on in the background, spread your scraps out, and just work through them. Store finished pieces in a box and you'll have embellishments ready to go for months.
They're small but they do a lot of work, and they feel genuinely handmade in a way that's hard to replicate with paper alone. It's one of those ideas I was given by someone else's work — a journal I bought arrived with a few of these tucked inside — and now I can't stop making them.