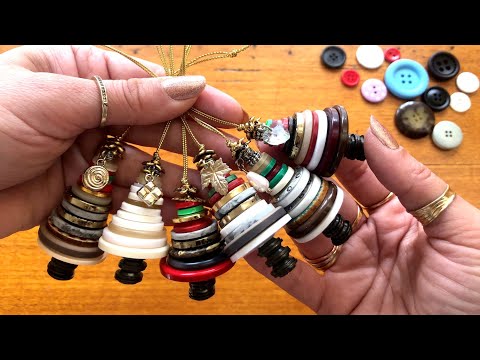
If you've got a button collection gathering dust — or a box of broken jewelry you've been meaning to do something with — this short tutorial is exactly for you. I'm making stacked button Christmas tree ornaments that double as junk journal charms and dangles, and the whole project uses nothing but scraps, salvaged hardware, and buttons you almost certainly already have. You can make them large enough to hang on a tree or small enough to attach to a journal spine, and honestly, they don't have to be Christmas-themed at all — a stack of your favourite buttons in any colour combination works beautifully all year round.
What we cover
I walk through two versions: a larger three-ornament display piece built from the base up, and a smaller monochrome button charm with a loop at the top for attaching a jump ring and claw clasp. Along the way I show how to work with four-hole and two-hole buttons, how to finish with salvaged beads and bead caps from broken jewellery, and how pipe cleaners work as a wire alternative to thread or ribbon.
What you'll learn
How to select and arrange buttons for a Christmas tree silhouette — choosing buttons that decrease in size from base to tip so the stack reads as a triangle. You don't need every button to be a different size; grouping two or three of the same size at each level works just as well.
How to prepare a base that stays put — using small same-size buttons staggered (offset from each other rather than stacked directly on top) so the base sits stable and doesn't shift.
How to thread buttons from the bottom up, including:
- Threading two-hole buttons straight through
- Threading four-hole buttons through diagonal opposing holes — not the adjacent holes — so the string runs cleanly through the centre
- Managing a fraying string end by snipping small bits off to keep a clean tip for threading
How to build the charm version from the top down — starting with a small loop knot at the top and threading down toward the base, which is the reverse of the ornament method and gives you a clean finished loop ready for a jump ring or clasp.
How to tie and secure the finishing knot, including:
- Pulling the knot tight and using a thick needle or tool to push it down as close to the buttons as possible
- Tying a square knot (left over right, then right over left) for a flat, low-profile finish when you want the base to sit flush
- Adding a small dab of glue on the final knot for extra hold
How to finish the top of the ornament — hiding the knot under a salvaged bead cap or loop finding threaded over it, which both conceals the knot and gives you a ready-made loop to hang from
How to attach a jump ring and claw clasp to the loop at the top of a charm, turning a simple button stack into something you can clip onto a journal, a bag, a zipper pull, or a gift
The pipe cleaner method — using a pipe cleaner in place of ribbon or string. You form the top loop by twisting rather than knotting, thread the buttons exactly as you would with string (and actually find it easier, because the wire stiffness guides itself through the holes), then twist and trim the end at the base. A good option if you find thread fiddly.
What to use from broken jewellery — bead caps, chain segments, small charms, and odd findings all work as toppers or dangles. Shank buttons (the ones with a loop at the back) can be strung on a single thread as a topper and look great from the front, though the side profile is less tidy.
Tips & gotchas
Offset the base buttons rather than stacking them straight on top of each other — even a slight stagger keeps them from sliding around once the stack is finished.
When you're threading a four-hole button, go through the diagonal holes. Threading through the holes that sit next to each other pulls the button sideways and the whole stack starts to lean.
Leave yourself more string at the top than you think you need before you tie off. I ran a little short on one of mine and it made the finishing fiddly. A few extra centimetres costs nothing and gives you room to work.
Once you've tied your finishing knot, use a needle or the tip of a thick tool to push the knot down toward the buttons before pulling the tool away and pushing again. Getting that knot sitting right against the top button is what keeps the stack feeling solid rather than loose and rattly.
That dab of glue on the final knot is worth doing — especially on a charm that's going to get handled. It takes thirty seconds and means you're not restringing buttons later.
If you're using pipe cleaners, the threading is genuinely easier than with ribbon or thin string — the stiffness of the wire means you can guide it through the holes without the end collapsing. The trade-off is the finished look is a little chunkier, so it works better if you keep the base small.
A few buttons, a bit of salvaged chain, and something from the broken jewellery box: that's genuinely all it takes. They make lovely stocking stuffers, and if you've got a crafty friend who journals, a little button charm clipped to their next handmade book is the kind of thing they'll actually use.