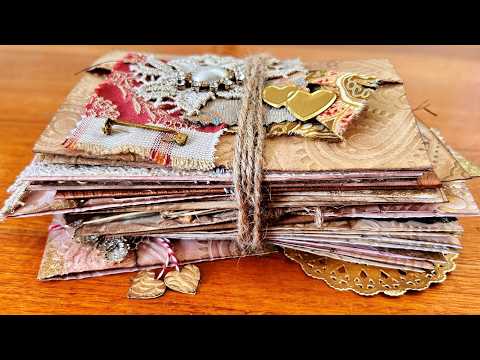
If you've ever wanted to turn a plain sheet of paper into something that looks like it arrived by post in another century — sealed, folded, and full of character — this tutorial is for you. Starting from a single piece of tea-dyed paper and three simple folds, I'll walk you through making these vintage Victorian-style folded letters, then show you every embellishing direction I took across the 32 I made in just a couple of days. The fold is genuinely easy. What comes after it is where you get to play.
What we cover
This tutorial starts with the core fold — horizontal and vertical orientations, two sizes — and then moves through a full range of embellishing approaches: embossing, inking, painting with gold, adding doilies and fabric, machine stitching, applying wax seals (in a way that still lets the letter open), and using closures made from baker's twine, ribbon, and brads. At the end, I do a show-and-tell of all 32 letters so you can see the whole range and gather ideas for your own.
What you'll learn
How to make the three-fold letter that unfolds into a full sheet, in both horizontal and vertical orientations, and in two sizes — full A4 and half A4.
Why the two flaps need to meet exactly in the middle — and what to do when they don't. If one side is even slightly wider, it won't tuck in cleanly. I show how to catch this before it becomes a problem.
How to rip the top edge before folding for a more vintage feel — and why doing it at this stage (rather than after folding) protects the tuck depth of the flap.
Three ways to add surface texture and colour, including:
- Running through an embossing machine (I'm using the Sizzix Big Shot with a flamingo-and-hedgehog folder, but any folder works)
- Scrunching the paper by hand for a worn, grungy look — no machine needed
- Brushing on watered-down gold poster paint for a pale, almost-ivory sheen that looks completely different once dry
How to apply inking to embossed paper — not just the edges, but along the raised texture itself — for that deeply vintage, dimensional look.
Working with doilies, lace, and fabric offcuts as layered embellishments, including:
- Gluing a dyed doily to the front flap (tea-dyed, cabbage-dyed, avocado-dyed — whatever you have)
- Layering fabric pieces and scrunched lace to build a small cluster
- Machine stitching fabric directly onto the paper envelope
How to apply a wax seal so the letter still opens, using a scrap of book page or baking paper placed upside-down inside the envelope before pouring the wax. Baking paper works better — it's non-stick, so it peels away cleanly without leaving print on the wax.
How to add gold flake accents with a glue stick and a small brush — no specialist supplies, just the kind of gold flake you can find in a two-dollar shop.
Making a closure with baker's twine or ribbon, including threading it under an existing layer (doily, lace, fabric) so it sits naturally without extra gluing, and wrapping it around to hold the letter shut.
How to attach a leaf or embellishment shape with a brad as a closure anchor, so the piece can open and close without anything being permanently stuck down.
How to cut and use a wallpaper window insert — cutting a window shape with the die-cut machine, placing a found image (book illustration, magazine clipping, pressed flower) behind it, and incorporating it as a focal element.
Building a small embellishment cluster from fabric scraps, broken jewellery, buttons, safety pins, dried flowers, die-cuts, and handmade or mulberry-style paper pieces — using whatever is already on your desk.
How to scale the project — a half-A4 sheet gives you a smaller letter that works perfectly tucked into a junk journal pocket or sent as happy mail.
Tips & gotchas
The single most important step is making sure both folded flaps meet precisely in the middle. Even a few millimetres of difference means the narrower flap won't slip inside the wider one. Hold everything in place with one hand before you crease — don't just fold and hope.
Rip the top edge before you do the final fold. Once you fold, you're shortening the flap. If you rip afterward, you risk making the flap too shallow to tuck in properly. On the one envelope where this happened to me, I had to add a longer closure to keep it shut — which works fine, but it's easier to get it right from the start.
Don't glue anything down over the opening flap. It sounds obvious, but when you're in the flow of layering fabric and doilies it's easy to accidentally stick across the opening. Keep checking that the flap can still move freely.
For the wax seal: slip a piece of paper inside the envelope, facing down, before you pour the wax. This stops the seal from bonding the two layers together. Book page works, but baking paper is better because it's non-stick and peels away without leaving residue. Be careful with an open candle near your papers and fabrics — it's worth taking a moment to clear the area before you start.
When working with a large selection of supplies, give yourself a smaller palette to work from. I pulled together a few fabric tones, one embossing folder, and a consistent colour story, and that made the whole batch much faster to produce. Decision fatigue is real — a short list on paper of all your embellishing options means you can just pick and go rather than staring at your desk wondering what's missing.
If a flap ends up too short to tuck in after all — it happens — use a closure to keep it shut instead. A piece of baker's twine wrapped around works beautifully and nobody will ever know.
They work tucked into journal pockets, layered inside each other for a Russian-doll happy mail effect, bundled and tied as a gift set, or simply displayed somewhere as a little piece of paper art. Once you have the fold down, the envelope itself becomes a stage — and what you put on it is entirely yours to decide.



