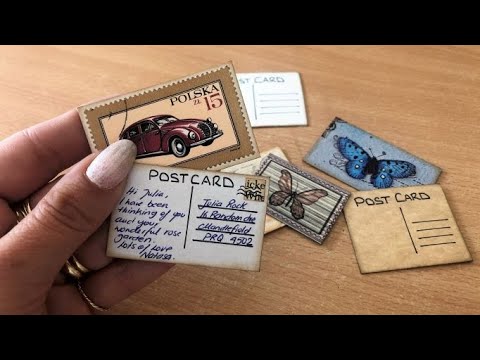
If you've got a stack of old magazines, catalogs, or junk mail sitting around and you're not sure what to do with it, this tutorial is for you. I show you how to turn almost any printed image into a postcard — for junk journals, happy mail, ephemera pockets, or just to tuck into a journal you're giving away. We make them tiny, we make them jumbo, and everything in between.
What we cover
This tutorial walks through selecting images from magazines, catalogs, cereal boxes, maps, washi tape, coloring book pages, and more — then turning them into finished postcards with inked edges, sewn borders, and hand-lettered backs. I show how to size them from miniature to oversized, how to back them properly so they hold up, and several different approaches to finishing the back.
What you'll learn
How to find usable postcard images in almost any printed material — magazines, catalogs, carpet and flooring brochures, gardening books, German craft magazines, cross-stitch catalogs, coloring books, wrapping paper, gift bags, tissue boxes, and cereal boxes all work. The key shift is learning to look at sections of an image rather than the whole thing — a corner of a living room photo, a strip of a map, a patch of grass with a butterfly sticker added on top.
How to size your postcards, including:
- Miniature postcards — tiny enough to sit in a small pocket or clip to a journal page
- Standard postcard proportions cut from a section of a larger image
- Jumbo / oversized postcards made from a full magazine spread or gift bag panel
- Using a whole image as-is when the proportions already work
Why I back images onto cardstock — the backing is what makes a postcard feel like a postcard rather than a scrap of paper. Cereal box cardboard is my go-to: the blank inner side is perfect, it has just enough stiffness, and it gives a lovely vintage feel. Any matte cardstock packaging works; avoid anything shiny because your pen will smudge on it.
How to glue images to cardstock without bubbles, including:
- Why I use PVA glue mixed with a little water rather than a glue stick
- How to smooth out bubbles immediately after gluing by pressing a flat card across the surface — the glue seeps out at the edges and the whole thing lies flat
- Why you can use a water-based glue here without worrying about warping (the cardstock backing absorbs the movement)
How to trim and finish the edges — trimming flush to the image, then inking both sides of every edge. That little ink line acts as a frame and makes even a plain cut look finished.
How to sew around a postcard — optional, but for the larger ones I run them through the sewing machine with a simple straight or zigzag stitch around the border. It adds something without being fussy.
How to create the back of a postcard, including:
- Drawing a center dividing line with a ruler and Sharpie, then four address lines on the right
- Writing "POSTCARD" (one word or two — I do whatever feels right) using a ruler as a guide so it sits neatly
- Making a faux postage stamp from a scrap of book page, cut into a small square with squiggly "cancelled" lines drawn over it
- Using an actual vintage postage stamp as the stamp image
- Adding a sticker as the stamp stand-in
- Leaving the back partially blank so you can fill it in later when you know where the postcard is going
How to use postcards in journals and projects, including:
- Slipping them into pockets or mini envelopes
- Clipping them to the bottom of a journal page
- Tucking them in sideways as a little surprise element
- Filling one out as a writing surface in an oversized journal
- Writing a real (or made-up) name, address, and note if you're filling it out as a journal element
Tips & gotchas
The biggest mistake I made in filming this was walking away from a large image after gluing it down. By the time I came back, the glue had dried with bubbles set in — too late to fix. With small postcards it's usually fine, but for anything larger, smooth it out the moment you lay it down. Run a flat card or piece of cardboard across the surface right away, before the glue starts to grab.
Skip glue sticks for this project. They feel convenient but they don't hold long-term — I've seen glued images start to lift after a while. PVA glue (white school glue) mixed with a little water works beautifully here and keeps everything permanently adhered.
When choosing your backing cardstock, avoid anything with a shiny or coated surface. Sharpie and regular pens can smudge badly on coated card, which ruins the back of an otherwise lovely postcard. The unprinted inside of a cereal box is ideal — matte, sturdy, and it gives that slightly warm vintage tone that works well for journal postcards.
When writing "POSTCARD" across the back, use a ruler. I tried freehand the first time and the difference is really noticeable side by side — it only takes a few extra seconds and it looks so much neater.
If you're actually sending any of these through the post rather than using them in journals, put a real postage stamp on them. The faux stamps made from book scraps look great in a journal context but won't get your postcard very far with the postal service.
They fit naturally into all kinds of journal formats: tucked into an ephemera pocket, clipped to a page, layered into a nature journal or a travel journal or a gardening journal alongside other found elements. The map ones in particular are lovely for travel-themed books, and the tiny ones — the really miniature ones — have a charm that's hard to resist. I find myself wanting to make smaller and smaller ones just to see how far it goes. If you already make mini journals, these little postcards slot right in and they're a satisfying way to use up even the smallest scraps of beautiful printed paper.