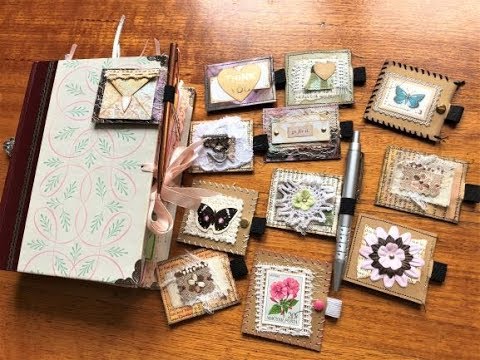
If you've ever finished a junk journal — spent hours on the covers, the pages, the little pockets — and then realized you have nowhere to keep a pen with it, this tutorial is for you. I made these removable pen loops because I was constantly losing my favorite pen the moment I set a journal down. The solution turned out to be a small, decoratable loop with a paper clip backing that you can move from journal to journal, clip to a cover, or tuck onto a first page. In this video I show you two ways to make them: one using a sewing machine and one using only hand tools and glue.
What we cover
This tutorial walks through building a removable pen loop from scratch using a folded cardstock or cereal-box base, half-inch elastic, and a paper clip. I cover both the sewing machine method and a no-sew alternative — including how to secure the elastic, close the sides, and decorate the front — so you can pick the approach that suits your tools and your style.
What you'll learn
How to choose and prepare the base material — sturdy enough that the loop holds its shape through daily use, but still foldable. Cereal box cardboard is a great choice; layered printer paper with a book page on top also works if that's what you have.
How to cut the elastic slit cleanly — marking the width of your elastic directly onto the fold, then cutting slightly narrow so you have room to widen if needed rather than starting too large.
How to thread the elastic through the fold and position it correctly — leaving just enough elastic inside the folded base to create a snug loop, trimming away the excess, and understanding why you attach both elastic ends to one side only (the other side has to stay open for the paper clip).
Two methods for securing the elastic to the base, including:
- Sewing machine method — a straight stitch run right across both elastic ends, holding everything flat before the sides are closed
- Glue-and-brad method — acetone-based quick-drying glue to bond the elastic, with a brad punched through cardstock and elastic as a backup so constant pen-in-pen-out use doesn't eventually pull it loose
Two methods for closing the three open sides, including:
- Sewing machine method — run all three edges through on a straight stitch so the loop is permanently sealed
- Hand-sewing method — punch holes through both layers with a slim tool, then work embroidery floss or thick thread around the edges using a simple running stitch, finishing with a square knot at the back
Why the side you attach the elastic to becomes your front — and how to use that to your advantage if your cardstock already has a pattern or finish you want to show.
How to decorate the front face of the loop — collage with book pages and postage stamps, layered fabric scraps, lace, cheesecloth, muslin, die-cuts inked up for contrast, paper flowers fixed with a brad. The decorating step is genuinely open-ended; I show you several finished examples so you can see the range.
How to add the paper clip and finish the loop — sliding a large paper clip in through the open side, with an optional dab of glue on the inside to hold the clip steady without getting any adhesive on the elastic.
Tips & gotchas
Cut the slit a little narrow. When you're marking the elastic width onto the fold and cutting, go slightly smaller than you think you need. If the slit is too tight you can always widen it with one more pass of the utility knife. If it's too large from the start, there's no fixing it.
Attach the elastic to one side only. It sounds obvious once you understand why, but it's easy to rush this step and stitch or glue both sides shut before you've thought about the paper clip. The side without the elastic attachment is where the clip slides in — if you seal it, you can't get the clip through.
Choose your glue carefully for the no-sew method. Hot glue seems convenient but it adds real bulk and I'm not confident it holds up to the repeated stress of pulling a pen in and out every day. A quick-drying acetone-based glue or a fabric glue that bonds firmly to both cardstock and elastic is a much better choice. Add the brad as a second layer of security — glue alone is doing a lot of work there.
Use a larger paper clip. A standard-size clip will technically fit, but a larger one sits more securely in the loop and doesn't shift around as much when you're sliding the pen holder in and out of journals. I keep a stock of larger clips specifically for this.
Half-inch elastic is the sweet spot. Very thin elastics can lose their stretch over time and they don't grip a pen as reliably. You don't need anything wider than about half an inch, but don't go narrower.
When hand-sewing, choose a slim-eye needle. A needle with a wide, bulky eye will stretch the holes you've punched and make everything look messy. Use a needle that stays slim all the way to the top — the hole stays tidy and the thread sits flat.
A little masking tape inside the fold before you cut the slit helps reinforce the fold line so you're cutting into something stable. It's optional, but it takes five seconds and makes the slit neater — worth doing.
A tiny folded envelope on the front with a closure gives you a spot for a small note — which makes these lovely for a journal you're gifting to someone. Layered fabrics, a die-cut inked up to stand out against a white base, a brad holding paper flowers in place — all of it goes on after the construction is solid, so you're always decorating on a finished object rather than hoping the embellishments hold everything together. Make a few at once, vary the fronts, and you'll always have one ready to go whenever a new journal needs a home for its pen.



