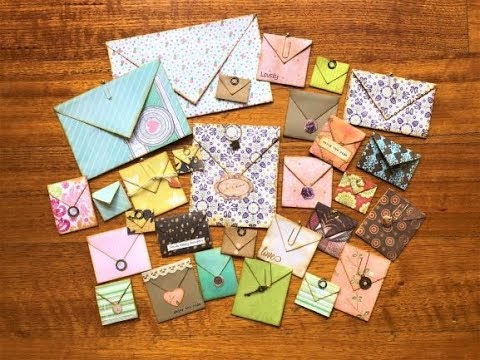
Flip-down envelopes are one of those junk journal elements that look far more involved than they actually are. This tutorial — Part 2 of my ephemera-making series — shows how to fold a strip of scrap paper into a tiny functional envelope that opens like a flap, sits beautifully on a journal page, and can hold journaling, photos, or quotes. If you've got a pile of paper strips you haven't known what to do with, this is exactly the project for them.
What we cover
I walk through the full construction of flip-down envelopes from paper scraps — how to fold, trim, and glue them — then cover a range of embellishment options (die-cuts, paper clips, charms, lace, stamping) and finish by showing how they sit inside an actual journal: clipped on pages, tucked into pockets, layered, or glued as a pocket element with a flip-out flap.
What you'll learn
How to choose the right paper strip for a flip-down envelope — the key requirement is proportion: the strip needs to be significantly longer than it is wide, or the fold-down mechanism simply won't work. One side should be clear enough to write on, since the inside of the opened flap becomes a journaling spot.
How to fold the pointed flap at the top, including:
- Folding both top corners in toward each other until they meet in the middle to form a triangular point
- Checking that the bottom edge of the folded corners forms a straight horizontal line before creasing — if it's askew, the finished envelope will look uneven
- Why I fold rather than cut the corners: the extra dimension it adds when the envelope sits on a page
How to fold and glue the envelope body, including:
- Folding the flap down with a small gap rather than right at the edge, for a cleaner finished look with a little visual breathing room
- Folding the bottom section up toward the crease (but not all the way) to form the envelope pocket
- Trimming at this stage if you want a different proportion — narrower and wider, or closer to square
Why glue sticks are fine for ephemera envelopes — I don't use glue sticks for journal construction because of the long-term hold, but for ephemera pieces like these, which aren't structural, a good glue stick works perfectly well.
How to ink the edges — running ink around all the edges, including the little triangular flap, makes the envelope pop on a page. It's a small step that makes a noticeable difference to how finished the piece looks.
How to embellish the closure flap, including:
- Die-cuts glued only at the very bottom tip so the flap can still open cleanly without tearing
- Paper clips slipped over the pointed flap — plain, or with small charms or gold beads threaded on
- Stamped strips of paper tucked under a paper clip
- Gold foil stickers on smaller envelopes
- Lace, ribbon, and string tied or clipped as decorative closures
- Small stamped sentiments directly on the envelope face
How to place flip-down envelopes in a journal, including:
- Clipped onto a page with a paper clip so the envelope can be removed to journal inside, then returned
- Tucked inside an existing pocket on a page — a hidden little element
- Glued on three sides to a page to create a new pocket, with the flap opening freely at the front
- Layered on a page, with notes on what still opens when you layer (only the topmost glued envelope)
- Slipped into or clipped onto a belly band — especially effective when the envelope has a charm with some length to it
- Glued across a corner pocket or tucked into the spine area as a small tuck spot
How to make a two-flap variation — instead of trimming the strip, leave the extra length and fold it twice, so you get two flip-out sections rather than one. The same basic construction, just extended.
Tips & gotchas
The proportion of your paper strip matters more than anything else. If the strip isn't considerably longer than it is wide, you won't have enough length to form the envelope body after the flap fold — the piece just won't close properly. When in doubt, reach for the narrower, longer strips in your scrap pile.
Before you crease the folded top corners, hold the piece up and check that the bottom edge of those corners forms a straight horizontal line. If one corner is sitting lower than the other, the envelope will look lopsided once it's finished. A small difference is forgivable; anything more than that is worth unfolding and trying again.
When you fold the flap down, resist folding it all the way to the edge of the pocket. Leaving a small gap adds a little dimension and makes the finished envelope look more intentional — it's one of those details that reads as deliberate craft rather than rushed folding.
For die-cut or sticker closures, apply glue only to the very bottom tip of the piece. If you glue too far up, the flap won't open without tearing. A tiny dot of glue is all it takes to hold the flap closed, and the envelope will still open freely.
Freshly made envelopes want to spring open — they haven't been creased long enough to stay flat on their own. That's completely normal. Once they've been sitting in a journal or stored in a stack for a while, they'll stay closed without any help.
Finally, thick paper is harder to fold cleanly at the corner step than thin or medium-weight paper. If you're working with something stiff, you may need to score lightly along the fold lines first, or accept that the corners won't meet quite as neatly. Thin vintage paper and lightweight scrapbook pages are the easiest to work with.
A tiny one with a gold paper clip sits perfectly at the edge of a page. A larger one with lace and a charm becomes a feature on a spread. And because the construction is so quick, an afternoon of scrap-busting can produce enough to fill several journals. Part 1 of this series covers baggies made from a similar scrap-friendly approach, and the two elements layer together naturally on a page.



