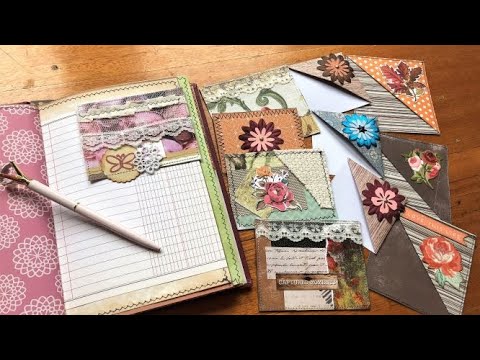
Corner huggers are one of those small-but-mighty additions that earn their place in a junk journal — pretty enough to be an embellishment, useful enough to be a real bookmark, and light enough to be moved around as you go. In this tutorial I show three completely different ways to make them: a collaged version built from book pages, magazine scraps, and fabric offcuts; a quick-fold version using two squares of double-sided scrapbook paper; and a traditional origami bookmark that needs no glue and no sewing at all. All three versions fit journals and reading books alike, and the only tools they need are things most paper crafters already have on hand.
What we cover
Three methods for making corner page huggers — collage-style with a sewing machine option, a two-square scrapbook paper fold, and a no-glue origami bookmark — along with how to embellish each one and a few practical notes on fit and sizing.
What you'll learn
How to make a collaged corner hugger from a folded book page, including:
- Folding and trimming a book page to your chosen size, then collaging one side with magazine images, fabric, lace, and scrap paper
- Sewing through the layers with a zigzag stitch to secure everything, or gluing all edges firmly if you're working without a sewing machine
- Cutting a smaller piece for the pocket side, rounding its corner so it slides cleanly onto a page, and stitching or gluing it into place
Why the stitching distance from the edge matters — the further your stitch line sits from the edge, the more the bookmark will protrude from your page once it's in place. A zigzag stitch farther from the edge sticks out noticeably; a straight stitch right at the edge barely clears the page. Worth thinking about before you sew.
How the pocket orientation determines which page becomes the focal side — if you attach the smaller pocket piece on the left, the decorated front faces the right-hand page; attach it on the right and the front faces left. You don't have to think too hard about it, but it's handy to know before you commit.
How to create a two-square corner hugger from double-sided scrapbook paper, including:
- Cutting a 12×12 sheet into four-inch squares and using two squares per bookmark
- Folding one square diagonally and deciding which face and orientation you want visible before you stitch or glue
- Sewing across all the layers in one pass — or leaving the diagonal fold open as a tiny secret journaling pocket
- Getting four bookmarks from a single 12×12 sheet, plus one leftover square to mix-and-match with another pattern
How to fold an origami corner bookmark with no sewing and no glue, including:
- Folding a square in half diagonally to form a triangle, then folding the top layer down to the base edge
- Folding the two side points up to meet the top point, using a ruler to place the crease accurately when working with thin paper
- Tucking both side flaps into the pocket so the bookmark holds its shape without any adhesive
- Covering the centre seam with a die-cut and brad embellishment — with the brad feet closed and glued on top rather than pierced through, so the metal doesn't catch on pages
How to scale any of these three methods to fit different journal sizes — the collage version can be as large as a full folded book page or trimmed right down; the scrapbook-paper version scales with whatever square you cut; the origami version works at six inches or at four, though thicker paper at smaller sizes gets stiff and harder to crease cleanly.
Why a focal point matters when you're embellishing — on a busy collage piece, one clear focal element (a small image, a flower die-cut, a sentiment) draws the eye in and lets the surrounding scraps feel intentional rather than cluttered. Without it the eye doesn't know where to land.
Tips & gotchas
If you're not using a sewing machine, be really thorough with the glue — all edges, not just the centres. A partially glued corner hugger will start lifting the moment it's handled, and the collage version in particular has a lot of small pieces that need to be fully secured before you can call it done.
Round the corner of the smaller pocket piece before you attach it. Even a small trim takes off the sharp point that catches on pages as you're sliding the bookmark on, and it makes a noticeable difference in daily use.
For the origami version, start with a perfect square. If the paper isn't square, the side points won't meet the top corner cleanly and you'll end up with a gap or misaligned edges. Trim before you fold, not after. Thicker scrapbook paper is harder to crease sharply in this fold — if you're using it, go slowly and press each crease firmly with a bone folder or the flat edge of your scissors. A soft crease will pop open on a thicker card.
When you add a brad to the origami bookmark, close the legs flat and glue the brad on top rather than pushing it through the paper layers. The metal legs sitting inside the pocket would scrape against your book pages every time you use it.
One thing worth deciding before you stitch the collage version: how far from the edge do you want to sew? A stitch line further from the edge means more of the bookmark shows above the page — which can look nice, but can also catch when a book is closed. If your journal pages sit close to the cover, keep the stitch tight to the edge.
The collaged version takes the most work — but it also produces something that genuinely looks finished and personal, the kind of piece that makes a spread feel designed rather than assembled. The scrapbook-paper fold is fast enough to make in a batch while watching television (the origami version, slightly less so). Once you've made a few of each, you'll likely find yourself reaching for different versions depending on whether you want something quick and functional or something that anchors a page.



