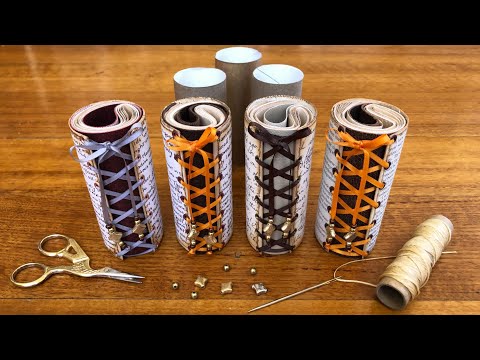
If you've been wondering what to do with toilet paper rolls that pile up on your craft desk — or if you've felt that vague cringe about using them for something you actually want to keep — this tutorial is for you. I had the same reaction before I made my first one, and then I made several more. The result is a small, fully bound junk journal that tucks inside the paper roll itself, with a ribbon-laced cover, beaded ties, and a little accordion of folded pages inside that springs open when you pull it out.
What we cover
This is a full step-by-step build of a mini junk journal made from a single toilet paper roll: covering the roll inside and out with book pages, punching and setting eyelets, weaving ribbon through to create the laced closure, binding a three-hole pamphlet-stitch journal with a faux leather cover and folded pages, and finishing the ribbon ends with beads, a square knot, and a sealed bow.
What you'll learn
How to cover a toilet paper roll with book pages — inside and out — keeping the tube's curve intact throughout so you don't end up with creases or lifting edges. This includes:
- Lining the inside first, then covering the outside with a single wrap
- Cutting and folding corners so every edge is clean and sealed
- Smoothing out air bubbles without flattening the tube
Why glue application at the edges matters more than coverage in the middle — the edges of your book page are what lift first, especially if you're skipping eyelets. Getting glue all the way out to every edge before you press the paper down is the thing that holds the whole cover together.
How to ink the edges of the roll for a finished look — optional but worth the thirty seconds, especially if your book pages have white edges or the cuts aren't perfectly clean.
Making and using a hole-placement template so your eyelet holes align on both sides of the roll, including:
- Cutting the template to the exact height of the roll
- Marking holes by eye (or measuring) and using the template consistently on each side
- Why flipping the template gives you misaligned holes — and how to avoid it
How to punch holes and set eyelets using a crocodile punch, with an alternative for when you don't have eyelets: using a Sharpie to colour the raw hole edges, which both reinforces them and gives a neat finish.
Threading ribbon through a laced cover, including:
- Starting from the inside out so the ribbon lays flat and doesn't catch on the journal as it slides in
- Working from the outside in for all middle holes to create clean, consistent X-crossings
- Keeping the ribbon twist-free as you go
How to make a pamphlet-stitch journal that fits inside the roll, including:
- Using faux leather or vinyl (or any soft, flexible material) as a cover — stiff covers won't roll up cleanly
- Cutting copy paper into three sections to get the right page height
- Folding all pages together in one stack and trimming the protruding inner edge for a straight finish
- Binding with a three-hole pamphlet stitch, tightening from the middle outward, and finishing with a square knot and bow
Why the cover length matters for how the journal behaves inside the roll — keeping the cover the same length as the pages (no extra flap) means the journal springs open when it's released inside the roll rather than staying tightly coiled. If you want a closure flap that wraps around the journal, you can cut the cover longer — but you lose that satisfying spring-open effect.
How to roll and slot the journal so it fits without forcing — roll it a little tighter than the opening, slide it in, and let it expand to fill the space.
Tightening, knotting, and tying the ribbon bow, including:
- Working the ribbon tighter gradually from the bottom up rather than yanking from the top
- Tying a square knot (left over right, then right over left) before the bow
- Adding a small dab of glue to the bow knot so it stays permanently in place
How to thread beads onto the ribbon ends and finish them, including:
- Tapering ribbon ends by cutting to a point, then singeing lightly with a lighter to stiffen them for easier bead threading
- Positioning beads and tying a knot directly underneath so they don't travel
- Singeing finished ends to prevent fraying
Tips & gotchas
Don't flatten the tube while you're covering it. The moment the roll goes flat, you get creases that are very difficult to get out — and the paper lifts at the edges. Keep one hand curved around the tube throughout and come to the edge of your desk when you're pressing the outside paper down so you can maintain the curve.
Get glue all the way to the edges of your book pages before pressing — not just in the middle. The middle is forgiving; the edges are where everything lifts. This matters even more if you're not using eyelets to reinforce the holes.
If you're skipping eyelets, move your holes away from the edge of the roll. Ribbon will eventually work its way through paper if the hole is sitting right at the rim. The eyelet solves this by reinforcing the hole; without one, distance from the edge is your protection.
Use a template for hole placement and keep it consistent — don't flip it. Mark one side, then hold the template on the inside of the roll for the other side so the top stays the top. Eyeballed holes look close until you line the two sides up and see the offset.
Let the bow glue dry before threading the beads. When you're working the ribbon through small beads you'll inevitably tug on it — and undoing a bow you've already glued is much more annoying than waiting ten minutes for it to set.
Taper your ribbon ends and singe them lightly with a lighter before threading beads. The stiffened point threads through tiny holes without needing a needle. Be careful with the lighter — hold the ribbon well away from the flame and just kiss the end.
Roll the journal tighter than the opening before slotting it in. It feels like it won't fit, but once it's inside and you let go, it springs open and fills the space exactly. That spring-open moment is one of the most satisfying things about this project — and it only works if your cover doesn't have a long closing flap.
They're also a genuinely useful way to think about scale: the constraint of "it has to roll up and fit inside the tube" is what makes the design decisions interesting. A longer flap, a different number of eyelets, a wider ribbon — all of it changes how the finished piece looks and behaves. There's more room to play here than the humble starting material would suggest.


