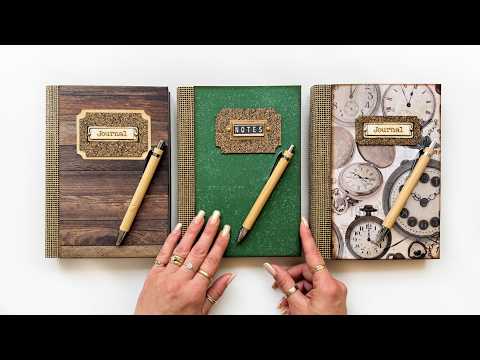
If you've ever stared at the craft fair shelves wondering where the handmade gifts for men actually are, this tutorial is for you. I designed this journal project with exactly that gap in mind — something a man will genuinely use, that you can make in batches, and that holds its own as a sellable item. The result is a clean, flat-opening folio-style journal with pockets, signatures, a fabric-wrapped spine, and a hard cover — all built from A4 paper, scrapbook paper, a little fabric or faux leather, and thick board.
What we cover
This tutorial walks through building a masculine folio journal from scratch — pockets folded from scrapbook paper, signatures bound with a three-hole pamphlet stitch, hard covers wrapped in paper with mitered corners, a fabric spine, and a bookplate with brads. It's designed as a batch production project: once you have the formula down, you can make several in a couple of days.
What you'll learn
How to design a folio folder structure with multiple pockets — the journal opens to reveal pockets on both sides, with signatures in the middle. You choose how many pocket sections you want:
- Two pockets front, two pockets back (four pieces of scrapbook paper)
- More sections if you want six pockets per side — just add more folded papers
How to size everything from a single sheet of A4 paper — because the signatures use A4 pages folded in half, the pockets need to match that height. I score at three and three-quarters of an inch on a scoreboard so every fold is consistent without re-measuring each time.
How to fold and crease pocket sections cleanly — fold in one direction, open, then fold back the other way to prevent bunching. A bone folder keeps creases crisp and consistent across multiple pieces.
How to prepare and bind signatures using a three-hole pamphlet stitch, including:
- Folding pages two at a time to keep them aligned before nestling them into a cover
- Entering the needle from the outside so the knot sits on the spine and stays hidden inside the book
- Securing the thread ends with a strip of masking tape before trimming
- Cutting the page edges after binding — not before — because binding pulls pages together slightly and the cut won't be level otherwise
Why the journal opens completely flat — no glue anywhere near the spine. That breathing space at the spine is what lets every page, in every signature, lie flat when you open it. Glue the spine and it cracks; leave it free and the whole thing opens like a dream — which is a genuine selling point.
How to make and wrap hard cover panels — cut two pieces of thick board (bookboard, cereal box, or similar) to size, glue your chosen paper on top using a glue stick plus solvent-based glue, miter the corners, fold and press all four edges down, and finish the corners with a bone folder to round them rather than leave a point.
How to attach a fabric or faux leather spine strip — trim the fabric to the exact height of the journal, apply glue to the paper sections on either side of the spine (but never onto the spine itself), press the fabric down, and leave it. Old tablecloth fabric or faux leather both work well here for a clean, masculine feel.
How to build and attach a bookplate, including:
- Layering paper, stamps, stickers, or cork onto a small piece of board to create a focal point for the front cover
- Using alphabet stamps to add a word like Notes or Journal
- Attaching the bookplate with brads so it's both glued and anchored through the cover
How to glue the covers onto the journal — use Art Glitter Glue or fabric glue on the fabric section, solvent-based glue on the paper sections, and maneuver the cover into position starting from one corner before pressing down. This matters: if you press the whole thing flat immediately, the glue moves and seeps before you've had a chance to align the edges.
How to ink edges throughout — signature covers, pocket sections, cover panels. That white cut line disappears completely once it's inked, and when you're gluing pages together the seams look seamless rather than patchy.
How to batch-produce efficiently — measure the first piece, then use it as a template for every subsequent piece. Cut in sections rather than through all layers at once. Get the bookplate decision made in advance, because that's the step that eats the most time.
Tips & gotchas
Don't cut pages before binding. I know it's tempting to neaten everything up early, but binding pulls all the pages together slightly. Cut first and you'll end up with uneven edges. Cut after, and the trim is clean.
Don't put glue all the way to the edge when closing pockets. The paper moves as you close it and the glue travels to the edge on its own — if you start at the edge, it seeps out. Leave a small gap and let the movement do the work.
Leave the spine completely free of glue. Even a small amount of glue near the spine will make the journal resist opening flat and can crack over time. Everything on either side of the spine gets glued; the spine itself gets nothing.
Use solvent-based glue on paper, not Art Glitter Glue. Art Glitter Glue (or similar craft glues) will warp paper if applied over a large area. Save it for the fabric edge, where it grips well without the warping risk.
Stay away from double-sided tape anywhere it can bleed through. On the inside of paper layers, the gumminess will eventually show through. Use it only where there's another layer going on top — like on the inside of a cover that will be covered with more paper.
Don't press under a very heavy book to dry. I made this mistake on an early journal and ended up with glue seeping all the way through to the back. A light journal on top is fine to help things set; a heavy stack is too much pressure.
When aligning glued layers, start from one corner and maneuver — don't press everything flat at once. This is the move that makes the edges flush. Get one corner placed, check the opposite edge, slide into position, then press.
Score before you fold for pocket sections, and use a single reference point on your scoreboard rather than re-marking each piece. That consistency is what makes the finished book look machine-made when it isn't.
Ink the edges as you go, not just at the end. The white cut line shows up between layers once things are glued — doing it before assembly means the seams disappear completely.
The decision that takes the most time in a batch run is the bookplate. If you're making these to sell, it pays to sort that out before you sit down to produce — whether it's a simple sticker, a stamped piece of board, or a layered cork-and-paper design. Once the bookplate is decided, everything else in this project moves quickly.
And because the structure is so adaptable — you can swap the signature papers for maps, use machine-sewn pockets, add expanding back pockets, or go full junk-journal inside while keeping the clean exterior — the same bones can become something completely different each time you make it.


