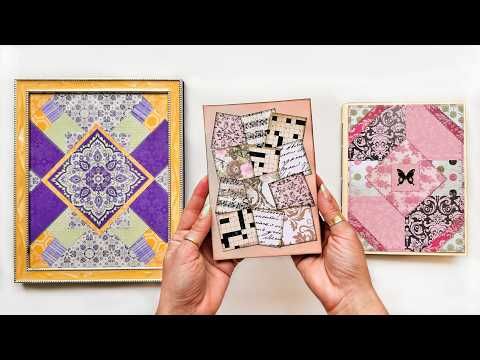
If you've got a pile of paper scraps you keep meaning to use up — off cuts from scrapbook pads, snippets of patterned paper, little squares and triangles that seem too small to do anything with — this tutorial is for you. I made a whole collection of paper quilting projects using nothing but those scraps: journal covers, cards, a pouch, a framed piece, tags, and a little notepad. The only real principle is working with symmetry and pattern rather than just gluing pieces down at random, and once you see how simple that is, the scraps start looking very different.
What we cover
This is a scrap-busting paper quilting tutorial — no fabric, no complicated sewing. I show every project I made before walking through the technique step by step: how to cut triangles and squares from your paper pad off-cuts, how to build a pattern by placing pieces first and gluing after, and how to finish edges whether or not you own a sewing machine. Along the way I demonstrate two approaches — a loose, improvised arrangement and a more intentional symmetrical design using coordinating papers from a single pad.
What you'll learn
The difference between paper quilting and just collaging paper scraps — it comes down to symmetry and pattern. Randomly gluing pieces down looks fun, but paper quilting means you're designing intentionally: these corners match those corners, a pattern repeats, something draws the eye to a center. You don't need perfect symmetry everywhere, but having some is what makes it read as a quilt rather than a collage.
How to cut your scraps into workable shapes, including:
- Halving a rectangle to get two large triangles, then halving again for smaller ones
- Cutting squares and rectangles from patterned paper sheets
- Cutting as you go rather than pre-cutting everything — you can work improvisationally, fitting pieces together like a puzzle
How to build a pattern from the outside in — starting at the edges of your canvas and working toward the center, layering pieces and adjusting until the arrangement feels right. Triangles are the easiest shape to start with because they fit together naturally and you can keep subdividing them into smaller and smaller pieces to fill gaps.
How to glue your arrangement without losing it, including:
- Taking a photo of your layout before you start removing pieces
- Removing pieces top-down (last placed, first removed) so you're always gluing from the base layer up
- Keeping a reference so you know where each piece belongs when it's time to put them back
How to work with papers that don't obviously match — when you're pulling scraps from different sources, you'll sometimes end up with pieces that clash. Adding a muted color between heavy patterns calms things down. Or you can keep going and let it be junk-journal-chaotic. Both work.
How to finish your piece without a sewing machine, and what that means practically:
- Running a line of machine stitching around the edges of each piece adds definition and makes everything look polished
- If you're not sewing, inking all the edges of your paper pieces before gluing them down gives a similar finished look — it takes a bit of work but it reads beautifully
- Faux stitching drawn on with pen is also a real option — I showed a piece where what looks like stitching is entirely pen
How a large symmetrical piece becomes two usable pieces — if you make a big symmetrical layout and aren't sure what to do with it, cut it in half. Because it's symmetrical, both halves are self-contained and usable. I did this with one of my first pieces to make two large tags.
What you can make with paper quilting patterns, including:
- Journal covers (bound with a few signatures inside, oriented however you like)
- Cards — a grid of squares is as simple as it gets and looks genuinely beautiful
- Tags, large and small
- Pouches — sturdier than they look, and honestly easier to make than you'd expect
- Framed pieces and collage elements
- Pockets for junk journal pages
- Notepads
Tips & gotchas
Take a photo before you start gluing. Once you've built an arrangement you like, photograph it. When you start pulling pieces off to glue them down, you'll be surprised how quickly you forget where everything was — especially with small triangles that could rotate four different ways.
Remove pieces top-down when you glue. Whatever you placed last, remove first. Work backwards through your stack so you're always gluing the bottom layer down first, then building back up. It sounds obvious until you're halfway through and suddenly everything's out of order.
Ink your edges if you're not sewing. The raw edge of a cut piece of patterned paper can look unfinished when it's glued down against another piece. Running an ink pad along the edges before gluing takes a little extra time but gives the whole piece that defined, quilted feel — especially if your papers have white cores.
Keep at least one muted piece in the mix. When all your papers are heavily patterned, they fight each other. I ran into this mid-tutorial and the fix is simple: find something with a quieter color, cut it into a triangle or square, and let it sit between the busy pieces. It gives the eye somewhere to rest.
Triangles first. If you're new to this, start with triangles rather than squares. They're forgiving — you can tuck them under, rotate them, layer them — and they naturally create symmetrical layouts without much planning. Squares are easier to cut but less flexible once placed.
You don't have to cut everything upfront. I cut as I went through most of the in-video demonstration. It's actually easier that way — you see what gap you need to fill and cut a piece to fit, rather than trying to pre-plan a layout from a pile of pre-cut shapes.
A large piece can always become two smaller ones. Don't feel locked in by the scale you start at. If something's too big to use as-is, and it's symmetrical, cut it down the center. You get two coordinating pieces that work independently.
A sheet of leftovers from a paper pad becomes a set of triangles; a handful of ephemera squares becomes a card front. The technique scales up to a framed wall piece and down to a pocket-sized tag, and the skills transfer directly — whatever you learn cutting triangles for a card works the same way on a journal cover. If you like puzzles and you like paper, this is one of those projects that's hard to stop once you start.


