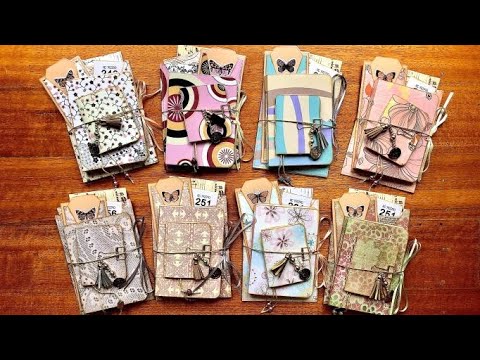
If you've got one sheet of 12×12 scrapbook paper and an afternoon, this tutorial shows you how to turn it into a coordinated six-piece gift set — a two-signature journal, a mini journal, an ephemera folder, a bookmark sleeve, a laminated bookmark, and a triangular page marker. Every cut is planned so nothing goes to waste, and the whole thing comes together as a wrapped, ready-to-gift set.
What we cover
Starting from a single cutting guide, we work through all six elements in sequence — cover scoring and spine-making, signature folding and three-hole pamphlet stitch binding, closure options (ribbon and eyelet, bead fringe, elastic), and machine-sewn pockets for the ephemera folder and bookmark sleeve. Laminating is covered in full, but so are the alternatives for anyone working without a laminator.
What you'll learn
How to cut one 12×12 sheet into six coordinated pieces with almost no waste — the cutting guide uses just three straight cuts to yield the journal cover, mini journal panel, ephemera folder panel, and bookmark sleeve base. The proportions are designed so every offcut has a purpose.
How to create a half-inch spine on a scrapbook paper cover, including:
- Finding the centre and marking a quarter-inch on each side
- Scoring both lines before any folding (especially important if laminating — an unscored laminated cover will spring back open)
- The simpler alternative: folding in half with no spine at all
How to make and bind two signatures using the three-hole pamphlet stitch, including:
- Cutting A4 copy paper in half (and in half again for the mini journal) to make folded signatures
- Making a paper template the exact height of the signatures to mark hole placement consistently
- Punching from the outside in so the neatest holes face outward
- Trimming signatures slightly shorter than the cover so rounded corners stay hidden
How to add closures to both journals, including:
- Eyelet-set ribbon ties for the main journal (setting corresponding eyelets on front and back covers so they align exactly)
- Bead fringe from embroidery floss tails for the mini journal, with a skeleton binder clip as the clasp
- Gold elastic cord with a tassel and jump ring charm as a presentation wrap for the full gift set
How to make an ephemera folder from a folded panel, including:
- Cutting a triangle flap from the folded top edge (with a small gap at the base so the point isn't flimsy)
- Inking all edges before assembly
- Sewing the three open sides shut on a machine, using binder clips to keep layers from sliding
How to make a bookmark sleeve, including:
- Building the sleeve from two layers — the decorated triangle piece plus a plain backing cut slightly larger on all sides
- Sewing close to the edge so the interior stays as wide as possible
- Sizing the bookmark itself narrower than the sleeve so there's room to sew and still slide it in and out cleanly
How to make a triangular page marker — aligning two triangle offcuts point to point, sewing across the top edge, and rounding the corners so there are no sharp ends.
Laminating for durability — how to lay out as many pieces as possible on a single laminating sheet to reduce waste, including small extras (tags, charms, journal covers) in any leftover space. Plus: what to do if a piece slips out during laminating and you're left with one stray item to redo.
How to present the finished set — stacking everything neatly, tucking the page marker inside the journal so it's not loose, wrapping with elastic cord, and finishing with a tassel on a jump ring. Options covered include tissue paper in a box, cellophane wrap with ribbon, and fabric or organza gift bags.
Tips & gotchas
Score before you fold, always — but especially before laminating. Once the laminate is on, a cover that hasn't been scored will keep wanting to spring back open. Score those two lines first and the fold is effortless afterward.
Punch from the outside in. The outside holes are the ones everyone sees; punching inward means the cleaner side faces out and any rough edges from the awl stay on the inside of the spine.
Trim signatures a little shorter than the cover. The journal cover has rounded corners — you don't want to spend time rounding every single signature corner too, so making the pages fractionally shorter means nothing pokes out beyond the cover edges.
When laminating, fill the whole sheet. Laminating sheets aren't cheap, and they do create plastic waste. Lay out every piece you're laminating for this project first, then use any remaining space for other small items — tags, charms, a spare cover. Don't run the machine half-empty.
No laminator? Two good alternatives. Glue several layers of scrapbook paper together to build up thickness, then skip the sewing and use glue to close the ephemera folder and bookmark sleeve instead. Or just use cardstock. What you really want to avoid is a single flimsy sheet of scrapbook paper as a spine with no support — it won't hold up.
Use binder clips before sewing the pocket pieces. The laminated pieces are slippery and shift easily. Clip the layers together before taking anything to the machine, remove each clip just as you approach it while sewing, and the seam stays straight.
Sew as close to the edge as possible on the folder and sleeve. Every millimetre you sew away from the edge is a millimetre of interior space you're losing. Get close.
Round the corners on the triangular page markers. It's a small step and easy to skip, but pointed corners on something that lives inside a journal will snag pages and eventually tear. A quick pass with corner-rounding scissors or a punch makes a real difference.
On laminating and plastic waste — it's worth saying plainly. If you already have laminating sheets on hand, using them is a reasonable choice. But if you don't own a laminator, there's genuinely no need to buy one for this project. The glue-and-cardstock route gets you the same result with less waste and less expense.
Different scrapbook collections change the whole feel — a set in deep winter florals reads completely differently from the same six pieces cut from a bold geometric print. The cutting guide stays the same; everything else shifts. And once you're comfortable with the three-hole pamphlet stitch here, the same technique scales up directly into full-size junk journals and softcover notebooks — so this little set is genuinely useful practice, not just a one-off gift project.


