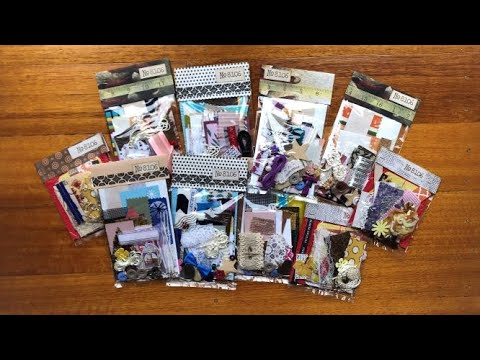
If you've got a box in your craft room where leftover bits land — the scrap of lace that didn't make it into the last journal, the buttons you pulled out and then didn't use, the postage stamp, the doily corner — this short video is about turning that pile into something someone will genuinely want to receive. The idea: gather your end-of-project leftovers, arrange them onto a simple backing card, tuck everything into a small bag with a folded paper header, and send it off as a gift with purchase or happy mail. I made one from scratch in this video, then used the contents to build a little scrappy journal — so you can see exactly what's possible when someone opens one of these up.
What we cover
How to assemble and package a scrappy gift bag from leftover craft materials, including how to make it look appealing rather than like a bag of junk. I also do a flip-through of the small journal I made entirely from the bag's contents — pockets, tags, tuck spots, a bookplate, a sewn trim on the back cover — to show what a curated mix of scraps can actually produce.
What you'll learn
How to assemble a scrappy bag that looks like a gift, not a giveaway pile, including:
- Arranging items on an embossed or decorated backing board first, so the bag looks considered before you seal it
- Using a sample cereal pouch (or any small clear bag) as the container
- Folding a scrap of patterned paper in half for the header and stapling carefully so nothing inside gets caught
How to finish the header so it looks intentional, including:
- Covering the staples with a strip of washi tape
- Adding a stamped number or label with a mix of black and brown ink
- Gluing on a small stamped tag or cut-out for extra character — even a cut-off barcode if you want to lean into the trash-to-treasure aesthetic
What to include in the bag for maximum usefulness — a mix of material types is far more inspiring than a lot of one thing. Papers alone, or lace alone, gives the recipient less to work with. A small selection of buttons, ribbon, a doily, a wallpaper scrap, a charm, some washi, a sticker or two — that variety is what makes it fun to open.
How to build a small journal entirely from scrappy bag contents, including:
- Making a bookplate by layering fabric, a doily, and paper
- Constructing a pocket from a leftover strip
- Making a tag from a wallpaper scrap and tucking ephemera inside
- Creating a tuck spot from folded packaging paper
- Sewing a piece of decorative trim onto the back cover (and why it still looks good when the thread breaks mid-seam)
- Using a sticker, a snippet of scrapbook paper, and paper ruffles as page embellishments
Why being limited to a fixed set of materials can actually help — working with just what's in the bag, rather than pulling from your whole stash, keeps decisions tight and often produces more cohesive results than starting with everything available.
How to present multiple bags as a series — varying the bag size (short and wide versus tall and narrow), and making a small batch at once so you have them ready to go with journal sales or parcels.
Tips & gotchas
Presentation really does make the difference between "this looks like someone's trash" and "this is a little treasure." Before the bag is sealed, take a moment to push things down gently so the backing card is visible, interesting items face forward, and the overall look is appealing through the front of the pouch. It takes thirty seconds and changes how the whole thing reads.
When you staple the folded paper header, staple into the folded part above the bag's opening — not through the bag itself. If your staple goes even slightly too low, you'll catch a piece of lace or a button and make a mess pulling it out. Slow down for that one step.
Include variety. The journal I made in this video used fabric, lace, a doily, wallpaper, a postage stamp, buttons, a sticker, a paper clip, and some trim — and pretty much everything found a home. If the bag had been only paper, or only fabric, there'd have been far fewer options and the journal would have been thinner for it. When you're filling a bag, ask yourself: do I have something soft, something papery, something functional (like a clip or a charm), and something decorative?
And if the amount of choice in your main scrap box feels paralyzing — that's exactly the point of making these bags. A small, curated handful forces creative decisions in a way that a full box never will. That limitation is a feature.
The whole system starts to feel satisfying rather than like you're just deferring the mess.


