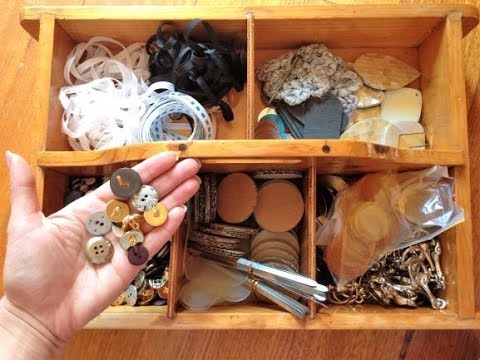
If you've ever wondered what a huge black rubbish bag full of factory offcuts, trims, cardboard, fabric, and assorted beautiful oddities looks like — this is that video. I took a trip to Reverse Art Truck, a resource centre here in Melbourne that collects factory seconds and industrial offcuts and sells them to the public instead of sending them to landfill, and I came home with more than I can show in seventeen minutes. But I show you a lot of it.
What we cover
This is a haul video — a walk through everything I brought home from Reverse Art Truck, with running thoughts on how I'd use each piece in journals, covers, closures, and mixed-media projects. It's part inspiration browse, part practical ideas session, and part encouragement to check whether you have a resource centre like this near you.
What you'll learn
What Reverse Art Truck (and similar resource centres) actually stock — factory offcuts, reject runs, industrial trims, vertical blinds, bulk cardboard, rolls of adhesive film, lace, fabric, magazines, and things you genuinely cannot name but will absolutely find a use for.
How to look at industrial materials and see journal components, including:
- Vinyl flooring samples as hard journal covers — the texture, weight, and surface patterns are extraordinary
- Cork offcuts as bookplate backings or cover embellishments
- Vertical blind slats as thick, sturdy tag material
- Adhesive contact paper rolls as functional cover or collage film
Hardware and findings as closures and embellishments, including:
- Flat metal buttons for interior use (they sit flush, no bulk)
- Raised buttons and metal hardware pieces as spine or cover closures
- Small unidentified metal clips that I instantly pictured holding an elastic closure
- Belt-hardware-style buckle pieces for cover embellishments
Buttons and decorative elements sorted by function — flat versus raised, antique-look versus modern, which types work inside a journal versus on the outside.
Using small mirrors as journal embellishments — I'd used one in a girly journal before and grabbed more when I spotted them here. The scale is right for front-cover details.
Fabric and lace sourced from offcuts, including:
- Lace yardage and lace-patterned fabric for shabby chic journal covers
- A metallic fabric I'm planning to run through the sewing machine as ruffles for journal edges
- A sequinned piece that immediately read "mermaid journal" to me
- A large piece of floral cut-work fabric — cut the flowers out individually or use the whole panel on a cover
Printed papers and thick card stock from factory runs — sticker-label sheets, thick art prints with beautiful surface patterns, genuine vintage paper, and an oversized 2014 travel calendar (thick, beautiful, full of international city imagery) that I grabbed specifically for travel journal projects.
Magazines as collage and insert sources — I picked up Frankie and Yen, both for their unusual inserts and imagery rather than the editorial content.
The case for buying multiples when you find something good — I always make two or three of anything at once, so when I'm sourcing materials I buy enough for that. A calendar I liked, I grabbed two. Fabric I wanted for ruffles, I took a few colours.
Tips & gotchas
When you're at a shared community resource like Reverse Art Truck, be reasonable about how much you take. There was a sign near the beautiful printed paper saying to take only a small amount — I took what I actually needed and left the rest. These places work because people use them sensibly.
That said, when you find something genuinely useful — metal buttons, adhesive film rolls, fabric you can see yourself using — buy enough to make two or three projects. Running out mid-project and not being able to go back for more is the frustrating version of this experience. Buy multiples of anything you have a clear plan for.
Not everything needs an immediate plan. Several things I picked up — the mother-of-pearl discs, the small bubble-shaped plastic pieces, some of the metal hardware — I genuinely didn't know what I'd do with them yet. That's fine. If something catches your eye and it costs almost nothing, take it. The right project will come.
The whole bag — a huge black rubbish bag, barely carriable to the car, half of it not even shown in this video — cost $30. That's the number to hold in mind when you're wondering whether it's worth making the trip.
If you're not in Melbourne, search for "reverse garbage" or "resource centre" in your area. These stores exist in most cities under different names, and the stock varies wildly — which is exactly what makes them worth visiting regularly.
The haul in this video doesn't represent a style or a budget so much as a way of looking at things. Most of what I brought home has no obvious crafting purpose stamped on it. That's what makes it interesting.


