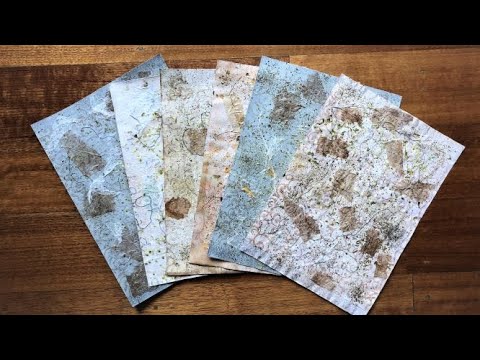
If you've been curious about making paper that looks handmade — textured, layered, flecked with dried flowers and thread — but without the full wet-pulp process, this tutorial is for you. I walk through a simple napkin decoupage technique that turns ordinary copy paper or cardstock into rich, tactile sheets you can use for journal covers, tags, cards, and all kinds of collage work. The only real limit is what you decide to embed inside.
What we cover
This is a step-by-step guide to making faux handmade textured paper using a PVA glue and water mixture, a single-layer napkin, and whatever flat, interesting materials you have on hand — dried flowers, loose tea, snippets of thread, gauze, or tea bags. I work through two versions on camera: one on coffee- and tea-dyed paper, and one on a green cardstock base.
What you'll learn
How to choose and prepare your base paper — any paper works, from plain white copy paper to parchment or cardstock. Tea-dyed or marked paper is especially good because the background already gives you some richness before you've added a thing.
How to mix your PVA glue solution — three parts PVA glue to one part water. You want it runny enough to brush easily but still with some body to it. Too thick and you'll fight the napkin; too thin and it won't seal properly.
How to layer your embedded materials, including:
- Sprinkling dried tea leaves or loose herbs directly onto the glue-coated base
- Trimming dried flowers into small pieces so nothing sticks up proud of the surface
- Scattering short lengths of thread — mixed colours and weights — without letting them form straight lines or tidy bundles
- Cutting and tearing gauze into irregular pieces and laying them flat
- Tearing open used tea bags and arranging the pieces in uneven shapes
Why I go through all the layering before the napkin goes on — that first coat of glue is really there to hold the small bits in place. It dries fast, and by the time you're ready to lay the napkin over, the tea and flowers aren't going to shift or blow away.
How to separate napkin layers and which one to use — most napkins have three layers; I skip the completely plain bottom one and use the layer just under the printed surface. It keeps a ghost of the original design — very faint, just enough to add a little something you notice only when you look for it.
How to lay the napkin and apply the sealing coat — place the single napkin layer over all your embedded materials, then apply the PVA mixture over the top with a gentle hand. You're not dragging the brush harshly across; you're coaxing the glue in. The napkin tears easily when wet, and a heavy-handed stroke will pull it apart.
How to work out air bubbles — once the napkin is down and you've started sealing, go over the whole surface carefully. Tap air bubbles flat rather than sweeping over them. Any bubble left to dry will harden the napkin in that spot and eventually cause it to crack and peel.
How to patch a tear on the spot — if the napkin rips while you're applying glue, don't panic. Take a small scrap of napkin, lay it directly over the tear, and glue it down. Once dry you'll barely notice it, and it will hold.
How to trim and release the finished paper — I leave the napkin slightly oversized while everything dries, then trim along the edge of the base paper with scissors. The excess napkin peels away cleanly, and you're left with a neat page.
Why cardstock makes a stronger finished sheet — when I'm making something that will become a journal cover, I use cardstock as my base. The multiple layers of glue and napkin add real stiffness, and the cardstock underneath gives it structure you just don't get from copy paper.
Tips & gotchas
Get the glue ratio right before you start. Three parts PVA to one part water is the sweet spot — runny enough to brush smoothly, but not so watery that it loses its grip. If you find the glue is dragging or pulling the napkin, your mixture is probably too thick.
Keep everything as flat as you can. Anything with height — a whole dried flower petal, a clump of thread, a folded piece of gauze — is going to be a problem once the napkin goes on. Trim dried flowers into small pieces, separate gauze threads rather than laying the fabric in a wad, and spread thread snippets out loosely. The rule I work to: if it's going to stick up over the page, cut it down until it won't.
Avoid uniform shapes in your embedded materials. This one took me a while to understand. If you tear tea bag paper into identical rectangles, the eye goes straight to them. Tear irregularly, mix sizes, overlap pieces at angles. Variation makes the texture read as texture, not as a pattern.
Bubble removal is non-negotiable. Go over the whole surface after sealing and tap out every air bubble you can find. A dried bubble doesn't just look wrong — the napkin in that spot will be brittle, and over time it cracks and starts to lift. Deal with them while everything is still wet and workable.
Patch tears immediately. Wet napkin tears easily, and if you leave a rip hoping to deal with it later, the edges will dry curled up. A small piece of napkin and a dab of glue, applied the moment you see the rip, fixes it invisibly.
Once the paper is dry, leave it under something heavy for a while — a book, a cutting mat, anything with some weight to it. Paper-based sheets especially want to curl and wrinkle as the moisture from the glue releases. Cardstock holds flatter on its own, but a weight won't hurt it either.
When you're trimming the finished sheet, follow the line of your base paper carefully and cut away the excess napkin around the edges. The undersheet pulls free cleanly, and you're left with tidy, finished edges.
Wear gloves if you don't like the feel of PVA on your skin — it goes everywhere when you're working this way, and it's much easier to manage with gloves on than to spend the session trying to keep your hands clean.
The cardstock version, in particular, has enough body to become a journal cover on its own — just cut to size, fold, and stitch. Lighter paper versions work beautifully as pockets, tags, or decorative pages inside a junk journal. And because each sheet is genuinely different — different threads, different flower fragments, different tea stains coming through from below — you end up with a small collection of one-of-a-kind papers from an afternoon's work, mostly using materials you'd otherwise discard.


