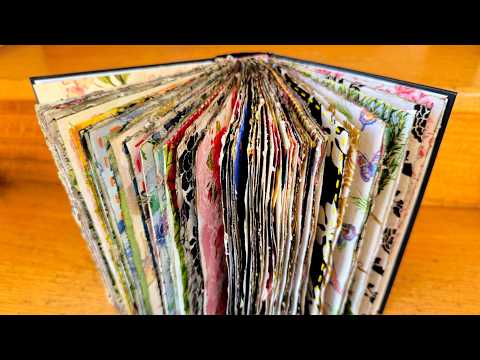
If you've spent years collecting decorative napkins — gifted ones, childhood swaps, finds from secondhand shops — and wondered what to do with them all, this tutorial is one answer I didn't expect to love as much as I did. I covered every single page of a hardcover book in napkin, then turned many of those pages into pockets, working one spread a night until the whole thing became something I'd genuinely call a little artwork. The flip-through is here if you want to browse first; the step-by-step process follows in the second half.
What we cover
This video is two things in one: a full flip-through of a finished napkin book — every page covered, thirty pockets, hand-stitching, and a black-and-gold cover — followed by a complete tutorial on how to make one yourself. That includes choosing the right source book, removing pages gradually without destabilising the binding, applying napkin with a PVA solution, trimming to a deckled edge, and constructing pockets that stay flexible rather than going rigid.
What you'll learn
How to choose and prepare a source book for this kind of project, including:
- Why a hardcover book holds up better than a soft cover during the long making process
- What to look for in the binding — stitched signatures versus glued pages, and how each affects your approach
- Why library withdrawals and books headed for destruction are the ideal raw material
How to remove pages from a stitched book without loosening the binding, including:
- Why the middle page of each signature — the one with the stitching — must always stay in
- How to identify and remove the sister page at the same time, so no leaves go loose
- Why removal is gradual and ongoing rather than done all at once before you start
How to work through the book evenly to avoid a warped spine — starting from the middle of each signature and building outward in a non-linear order, so bulk accumulates evenly across the whole book rather than front-loading one end.
The two-step napkin application process, including:
- Separating the napkin to a single ply using a small piece of sticky tape to get it started
- Using a glue stick first to position the folded napkin snugly into the spine before painting over with a runny PVA-and-water solution
- Smoothing from the middle outward to prevent bubbles
- Why you need to be generous with the glue solution and never try to remove excess — the water evaporates and takes the bulk with it
How to trim the napkin to a deckled edge after drying — cutting the protective pages away, then nipping with scissors along the book edge and ripping the napkin for a naturally ragged finish, rather than cutting it clean.
Why pages should never be fully glued together, and what to do instead:
- How fully glued pages create rigidity that stops natural page movement, causing buckling and bulk at the spine
- Using hand-stitching — straight stitch or blanket stitch along the edge — to join pages while still allowing flex
- How gluing pockets only at the top and bottom edges (not fully) lets the middle of the page find its own movement
How to make pockets from napkin-covered pages, including:
- Gluing at the top and bottom edges only for standard side-loading pockets
- One variation left fully open at the top for easy access
- Why top-loading pockets are harder to use in practice — and why, after trying one with the sewing machine, she went back to glued side pockets for the rest
How to protect and embellish the cover last — keeping the original cover on throughout the entire making process, then removing it only when the book is finished and ready to decorate.
Tips & gotchas
Never remove the middle page of a signature. That's the page where the stitching runs through, and pulling it out loosens the whole binding. Work right next to it, but leave it intact.
Remove pages gradually, not all at once. After covering six or so spreads, check how much the book has grown. Then remove a few more pages. This back-and-forth is the whole process — bulk and removal in conversation with each other — so you end up with a spine that closes cleanly rather than a book that gaps open.
In a sewn book, always remove the sister page. Each leaf in a stitched signature is one half of a folded sheet. Pull one half out and the other goes loose. Find it — it's the page directly opposite in the same signature — and remove both together.
Make your PVA solution runny. It should flow easily off the brush. If it's too thick, you'll drag the napkin and tear it. A dry brush over wet napkin is the main way things go wrong here.
Glue stick first, solution second. The glue stick holds the napkin in position while you paint; the PVA solution does the real bonding. Get the folded edge of the napkin snug into the spine before opening it out, and start your brush strokes from the spine outward.
Don't be stingy with the glue solution. Cover every millimetre of the napkin, including right to the edges and onto the protective paper underneath. The excess water evaporates — don't try to lift or scrape it off.
Only glue the top and bottom of pockets, never the full page. A fully glued pocket is rigid. Glued only at the edges, the middle of the page can still flex, and the book will open and close naturally. The same logic applies to any pages you want to join: hand-stitch rather than glue, and leave movement in the middle.
Work on pockets in a non-linear order — one near the front, one near the back, one in the middle — rather than front to back. This spreads the new bulk evenly and prevents the spine from warping to one side.
Do the cover absolutely last. The cover takes knocks throughout the making process. Leave it in place as protection until the book is finished, then remove it, embellish, and put it back.
Any thin, patterned paper that you've been hoarding and not quite known what to do with — tissue paper, printed rice paper — could follow the same logic. And because none of the pages in this book are glued together, there's still room to embroider through the spreads, add stitched embellishments, or use the napkin as a base layer for a proper art journal background. I didn't go that route — I liked the napkins too much to cover them — but it's there if you want it.


