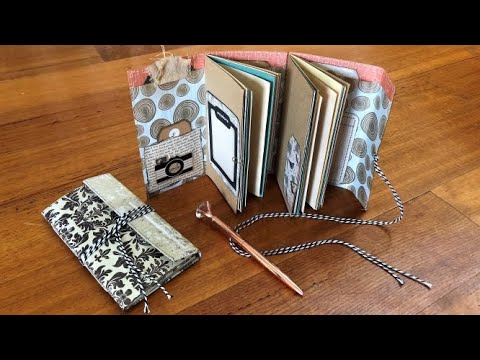
If you've got a single sheet of scrapbook paper and about seventeen minutes, you can walk away with a complete little journal — pockets, signatures, closure, and all. This tutorial shows exactly how I make mine: folding, sewing, and binding everything from one sheet into a compact travel journal with real writing space and room for tags, journaling cards, and a tucked-in pen.
What we cover
Starting with a single 12×12 scrapbook sheet, I take you through folding the cover structure, machine-sewing the pockets, binding two pamphlet-stitch signatures, adding embellishments, and finishing with an eyelet-and-twine closure. The result opens out to reveal three pockets, two bound signatures, and several journaling spots — small enough to keep in a purse, pretty enough to give as a gift.
What you'll learn
How to choose the right scrapbook paper for this structure — specifically, why a non-directional pattern matters. Once you fold, some designs end up upside down on part of the cover. A non-directional print sidesteps the problem entirely.
How to fold the cover into a working structure, including:
- The initial bottom fold that sets the journal's height (leaving a small strip at the top)
- The first interior fold at roughly 3¾ inches to house the first signature
- A second fold with just an eighth of an inch gap to give the second signature room to sit
- A matching closure fold on the outside
How to sew three pockets and a cover in one session at the machine — I stitch all three open sides of the outer cover in a single pass, which seals the whole structure without any trimming needed. Then I topstitch down the interior fold lines to define the pockets. Neither is technically necessary, but both make the finished journal feel intentional.
Why stitch length matters when sewing through paper — I set mine between 2 and 3. A tighter stitch perforates the paper and the fold will eventually tear; a longer stitch holds cleanly.
How to bind signatures into folded covers using a three-hole pamphlet stitch, including:
- Piercing through the signature and the cover fold in one pass using a centering template
- Binding from the center hole out and back
- Finishing with a double knot rather than a bow to avoid extra bulk inside a tight journal
Why I make a small secondary fold next to the second signature's binding point — rather than stitching right into the existing sewn fold, I crease a tiny spine fold beside it. It's a small thing, but it gives the signature breathing room and the journal lies much flatter when closed.
How to embellish without overfilling — I walk through how I layer in a scrap-paper pocket, journaling cards, book-page strips, tags, and a lined-paper journaling spot, while keeping the whole thing closeable. There's a real ceiling on how much you can add before the journal won't shut, so I show what I kept and what I left out.
How to add an eyelet-and-twine closure, including:
- Using a silent setter (mine came from eBay) to punch the hole and set the eyelet cleanly
- Eyeballing the center of the journal for placement
- Adjusting the closure spine fold after embellishing, because the final thickness of the book changes how the flap sits
Tips & gotchas
Choose a non-directional scrapbook paper before you start cutting. It's the kind of thing that seems like a minor detail until you've folded everything and half the pattern is upside down. Directional papers can work — they're just more of a puzzle.
Set your sewing machine to a stitch length between 2 and 3 when stitching through paper layers. A standard stitch length is too tight and will perforate the paper along the fold line. Backstitch at the start and end of every run — otherwise the thread will pull loose the first time someone slides a tag in and out of a pocket.
Don't embellish before you've set the closure fold. I do it the other way in the video — I fill the journal first and then adjust the spine — and it works, but the key insight is that the closure fold has to be made after you know how thick the finished book actually is. If you make it before embellishing, it almost certainly won't close properly once everything's in.
Related to that: go minimal with what you put inside. Three tags, a couple of journaling cards, a strip of book page — that's about right. Every layer adds thickness, and this journal closes by wrapping a flap over everything. When I showed my prototype, I'd already learned that lesson. Keep it lean.
The tiny secondary spine fold next to the second signature is worth doing even though it looks fiddly. That eighth-of-an-inch gap gives the signature somewhere to live so it doesn't get compressed against the pocket stitching. The journal opens and lies flatter because of it.
If your eyelet tool is a silent setter rather than a punch-and-hammer kit, the technique is the same — you're just not disturbing the rest of your workspace at midnight. I picked mine up on eBay for a reasonable price, and it handles both the hole and the setting in one motion.
The folding logic becomes automatic, and from there you can change everything — the scrapbook paper, the number of signatures, the embellishment theme — while the structure stays the same. A travel journal, a gift for someone heading off on holiday, a little notebook to keep in your bag: the format scales down to wherever you want to take it. I've found that the prototype phase is actually where most of the real decisions happen, so don't skip it — even a rough version in plain paper tells you where you need the extra fold and how thick you can afford to go.


